Friday, May 13, 2011

Mother's Day Card

I have recently gotten some Martha Stewart punches.  They are the deep edge Aster punch, the Starburst punch around the page border and corner punch and the Starburst punch around the page punch that allows you to punch anywhere on the page (i.e., in the middle of the paper).  They had been sitting on my craft table, staring at me...you know...you buy something cuz you think how cute it would be to do a project like that, and you get the item and then it sits and stares at you...at least some of my supplies do that!  Not with everything, but with a few things.  Anyhow, I digress...I decided Mother's Day was the perfect time to use these punches.  After a few attempts with the punch around the page punch I got the idea.  First of all, the way these punches are set to work, you must have evenly sized paper on all sides (if I'm wrong, someone please enlighten me!).  If you don't, you get some half punched flowers or starbursts and others with holes in them.  After I figured that part out it turned out to be pretty easy.  I used purple card stock to punch around for the background against which I mounted some pretty patterned paper from K&Company's Botanical Specialty paper pad by Susan Winget.  She makes some beautiful papers.  I stamped my Mother's Day sentiment on the patterned paper.  I then had a background to mount the butterflies I had cut with my Sizzix machine and my SU! butterfly die.  I then added a large Aster flower made with the deep edge punch out of contrasting green color and added some bling.  What card or project is complete with out a little bling.  I mounted all of this on a specialty white iced looking paper.  On the inside of the card I used my butterfly stamp and stamped butterflies on the left edge of the card, then covered one of the stamped images with a pretty, glittery, blinged out butterfly, and added another butterfly die cut from the Sizzix and added the schwoopie in the lower right corner.  I thought it turned out pretty nice.  My mother-in-law liked it which is the important part!  Thanks for visiting today.  Hope to see you again soon!
Imagine, Create, Enjoy!

Gift Card Holders

Last fall sometime, I was surfing the net and found a cute little StampinUp! tutorial on some easy as pie gift card holders (I don't recall the blog or video offering, sorry).  I thought I'd give it a try since I had lots of scraps left over from my journal gift making marathon!  The paper scraps were mostly from Christmas pads but some of the patterns and colors were generic enough they could be used for general gift card holders.  I have altered the original design.  That demonstrator used solid card stock with patterned paper on the flap only; I used patterned paper mounted on card stock for the entire card holder.  The measurements are approximately 7-5/8” long by 4-3/4” wide and then scored at 1-3/8” and 4-1/2” to provide the cards folds.  They use a standard 4-3/8 x 5-3/4 inch envelope, sealed and cut in half, which provides you with two pockets.  These are glued together back to back and then glued to the card stock.  One half of the envelope holds the card you see below with your sentiment on one side and blank on the other side to personalize and the other half of the envelope holds the gift card.

On the outside you cut 3 pieces of solid card stock, patterned paper, and then your other solid card stock for stamping your sentiment or decorating as you see fit with stickers, etc.  In these samples they have Christmas holiday sentiments stamped on them.  I then glammed them up with some Stickles and some bling. Once completed, this block is adhered to the lower front of the front flap with pop dots to make it stand away from the background.  It functions as the piece that holds the flap in place once you have put the sentiment card and gift card in the envelope pockets.

The last card is more generic, although the papers, as noted above, were from a Christmas paper pad.  This one will be used for a thank you gift for someone.  These are handy little gift card holders and can be adapted for most any gift situation.  I showed them to a friend who made some for her BUNKO gifts when it was her turn to be hostess. 


Thanks for visiting today.  Imagine, Create, Enjoy.


Monday, May 9, 2011

Kraft Class


Gift Card Holder
This past Saturday I got to take a class on crafting with Kraft paper and mixed media.  The guest instructor came down from Berkeley and we had 2 and a half hours of crafting madness and fun.  We received all kinds of goodies when we got to class...more than enough supplies to complete the projects the instructor demonstrated and led us through as well as much more to continue on our own.  The first project was a gift card holder shown here.  We used a butterfly patterned paper cut to 5 x 12 and scored at 5 inches for the center fold and then at about 3/8 inch and about 1 and 1/2 inches.  The top is kind of eyeballed.  The accent pieces are just Kraft paper stamped with a couple of different designs.  We cut out a couple of butterflies and mounted them as well as some additional accents.  A cute gift card holder.

Party Card
The second project was this card.  The instructor had some patterned paper with cows on it.  We cut that to fit on the scored card stock, added the craft envelope on the left, the arrow from a scrap from the back side of the cow paper (don't you love double sided paper!).  On top of the envelope a clear button with some thread through the eyes and glued on top of the stamped area on the envelope.  Three brads to the left of the button, added the brown arrow cut on my Cricut and other accents and the words Party till...on the front of the card.  If you don't understand or know the old saying it goes "Party till the cows come home!"  Great card!

Gift Tag
The final project I completed in the class was this tag!  I've watched my co-worker Jayne make some absolutely beautiful and amazing tags, so I was anxious to get the chance to create my own masterpiece.  We started with a standard manila colored pre-cut tag, added the seed packet accent after smudging/inking the edges.  Added a ticket with some shwoopie's on it and a Kraft square stamped with a postage stamp image, along with a small film strip stuck in next to it.  I also learned how to make an apron pleat (I believe this is the terminology).  We folded the paper after inking it up and made the pleats, added a canvas inked flower on top of a textured paper flower (material by Tim Holtz) with a small brad in the center and attached to the pleat.  I then added a little bit of floral lace on top and affixed the whole thing to the bottom of the tag.  Finally to finish it off we had some paper twist ribbon which I tied in a bow after adding the little dragonfly charm.  Turned out pretty nice I think. 

Hope you enjoyed today's post.  I certainly had a blast making it all and sharing it with you.
Imagine, Create, Enjoy.

Tuesday, April 12, 2011

Photo Book/Journal

My niece Teri crafts through sewing.  She inherited a fabric supply when my mom, her grandma passed away awhile ago and she has been busy with her own set of projects.  We are now in the process of bartering goods back and forth…her bags for my paper crafts.  Why do I mention this you ask?  She asked me to make a different kind of journal for her as part of my barter payment.  It is more of a photo/journal album than a straight journal.  Because she makes quilts, she wanted a book to put pictures into and then be able to journal on the pages to add details about the specific quilts.  I think it turned out quite beautifully.

These papers are by K&Company, Susan Winget’s beautiful Spring Blossom floral paper pad and embellishments. I also tried a new idea.  I wanted to create a clasp/closure on this one and found some beautiful buttons by Bazzill called Bazzill Buttons. I took the button and sewed it on the front of the book through the cover.  I then covered the inside with matching card stock.  On the back cover I cut a length of elastic and glue mounted it with a loop sticking out the end.  I then put additional reinforcing photo mount squares over the elastic, and matching card stock covered it on the inside back cover.  The word Quilts is chipboard cards that match also from Susan Winget collection as are the butterflies on the front cover.   


Until next time.  Imagine, create, enjoy!

Sunday, April 10, 2011

Journal/Planners


Black Friday Shopping
Gal Pals

So last fall, a friend of a friend and fellow blogger Cathy –Scrapping Cat! took the journal idea to a whole new level by making it into a holiday planner with beautiful Christmas papers.  Well I just had to give it a try as soon as I saw it!  They would be a gift for my Black Friday shopping gal pals!  These turned out great and very beautiful…the papers and embellishments out there today are wonderful. These particular papers are DCWV The Christmas Combo stack. 


Christmas Planner and Mini Book

I also found mini composition notebooks at the Dollar Tree store!  Love that place!  I used leftover scraps to doll up a small version as a little shopping list notebook, or place for notes, or whatever!  Just the right size for the pocket or pocket book!  

Everyday Planner

These have tabs at the top of the book with 4 different focus areas for the holidays: to create, to bake, to buy, to do, all subjects that Cathy had used in her original design.  Once I had done a few of these I was chatting with a co-worker on how they could be made for everyday use and what the tab subjects would be. We came up with the following subjects: Shopping, To Do, Appointments, Bills. I then made one that can be used for everyday use.  I used my Cricut to cut some hearts of the matching papers from My Mind's Eye "Home" paper stack, added some texture to the hearts with a dots embossing folder, cut a label for the front, and used my EKSuccess edge punch to give it some swirls and added a little bling in the corner.  This was a birthday gift for a sweet friend who is an expert list maker!

So this idea as Cathy mentioned in her blog lends itself to a variety of adaptations, daily planners specifically tailored to individual needs, travel planners, etc.  You get the idea.  Soon I’ll be posting another take on this traditional idea that my niece came up with.  First I need to send her the finished product!  Until next time… Imagine, create, enjoy!


Saturday, April 9, 2011

Paper Bag Photo Books


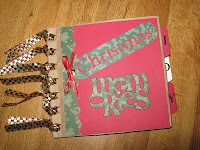
1st Attempt -- Christmas Album

A couple of years ago I saw at a local craft store a sample paper bag book for which they were offering classes.  Well with Christmas approaching I really couldn’t afford the class, but I did have a supply of scrapbook paper, embellishments, and some brown paper lunch bags I could use to try my own version of this idea.  Well, that was then, and a year and a half later I have thoroughly enjoyed crafting these great gift ideas.  I also have managed to sell a few to my friends who readily admit, crafting is not their thing!   I have used different papers, depending on the theme I wanted to highlight, i.e., Christmas, Valentine’s Day, Travel.  So for this first attempt I used paper I had in stock, a my tab punch, my handy Cricut machine and stickers and embellishments in my stash.  To secure the spine of the book I punched seven or eight holes with a standard hole punch. For this first one I cut individual lengths of ribbon and slip knotted them around the holes. That didn't work so well, the ribbon I chose was rough and they want to frequently work loose. On future books I changed my strategy at the suggestion of a co-worker and have now started weaving a matching ribbon approximately 36 inches long once down through the spine and then turned around and wove it right back up the spine.  At the top I then tied a bow.  You can also attach jewels, beads, trinkets, whatever you want to personalize it.  Here are a few samples of other themes.
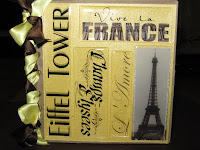
Travel Album

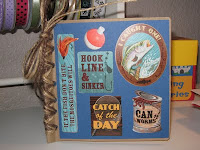
Fishing Album

I varied the themes and methods but the general idea comes through.  For the fishing book I used two or three different colors of twine I had laying around, doubled it up and wove it through the spine.  I also added a couple of small fish hooks.  This is my son Nathan and his fiance Laurencie's brag book for when they go fishing.
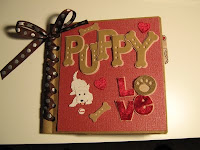
Puppy Love Album

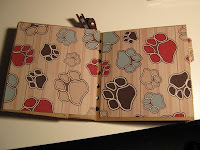
Inside Pages Puppy Love Album


 This book is for a dog lover friend and former co-worker.  The ribbon has little paw prints on it and I managed to find some paw print and dog bones papers for the insides.  She loved her little Dog Album. 


Recently there have been a number of friends, friends of friends, aquaintenances who have been diagnosed with cancer.  I wanted to do something that would allow them to record this part of the journey in their life.

Front of Album

I came across these embellishments at JoAnn’s, themed around cancer.  Surely that sounds a little weird, but it gave me an idea…here is a sample of what I gave my friend. 
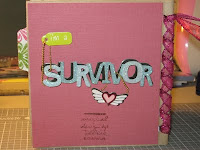
Back of Album


To these survivors I take off my hat. You are exceedingly strong and I admire you. 

If you are looking for a simple, imaginative, way to treat someone with a special gift that will help them store their memories, this is a perfect little project.  Until next time... Imagine, create, enjoy!  


Thursday, April 7, 2011

Artistic Block

Anyone who has every made anything, and I do mean anything, has probably suffered from artistic block.  It is the bane to everyone that designs or creates something.  That time in your creative endeavor, whatever it may be, when you can not, for the life of you, come up with the way you want to lay out your pictures on the scrapbook page, or the paper colors you want to use with those pictures, or the card you want to make, or the gift you want to create.  You see ideas and you think how cute is that, but when you sit down to work your own magic, you can’t get it right, you don’t have the right colors of this or that, you don’t have the right embellishments, you just don’t!  Those moments are some of my most frustrating…I know what I want in my mind, but can not, for some unknown reason, translate that to the project. 

So what have I done to get over the artistic block?  I wish it was something profound…I think it’s more basic than that.  I take a step back…I put the project out of my mind (at least the forefront of my mind).  I believe it is still there, simmering if you will, in the back of my brain.  Peripherally, I’m still rolling it around, it’s not taking up major space, but it’s there, in a file drawer waiting, waiting.  For me, it is sometimes the most simple things that open that drawer…watching nature, observing people, leafing through magazines, idea books, browsing in a store, and then it comes, an “ah ha” moment, when it clicks. You become so excited again at the potential of what your project can become!

Thanks for stopping by, until next time!  Imagine, create, enjoy!