Showing posts with label Birthday. Show all posts

Sunday, August 16, 2015

Make 'n' Take Card Class

I spent some time a week ago on Saturday at a Make 'n' Take class put together by my friend Tina Dowty, a Stampin Up demonstrator and Cathy Trumbo, who is also a Stampin Up demonstrator.  They do a once a month card class in Rocklin.  It is about a 3 hour class and for a small fee we get the opportunity to make 8 cards during this time frame.

All of the paper pieces, ribbon, string, are pre-cut and there are examples for us to use as a guide for putting together our cards.  We do get to do some of our own crafting, such as stamping the sentiments for the cards, inking the cards if it is a stamped card, and punching out flowers or cutting out butterfly's, whatever the card design calls for.  We are free to use our own artistic license in putting the cards together, and we are not required to do them exactly as the examples show.

These are the cards we did this month.


These two were fun.  The background paper we stamped on was printed with stars and dots.  We inked the sunburst and then sponged over it.  When we were done, we wiped off the ink so the stars and dots came through.  It was a cool technique.  A die-cut of the word happy and stamping the word birthday and we got a cute little birthday card.

These two were our first stamping project for the afternoon. We stamped the butterfly and then used a framelit die to cut out the butterfly.  On the background white we inked some scattered dots and a couple of opaque small butterflies.  We put some pearls down the center of the butterfly and used some pop dots to raise it off the background.  We stamped Happy Birthday along the bottom and then mounted this on some pink card stock and then on craft paper cards.  A beautiful little card.


These two cards were our 2nd inking project of the day.  It was a layered flower stamp set using pinks, corals, greens, and yellows.  It also uses a yellow ribbon to tie everything together.

The final project was a paper piecing project using some reversible paper.  That nice thing about them is you can use both sides of the papers to complete your card.  This one included a couple different sizes of punched flowers and as a background to the printed papers we had an embossed background in white that was mounted on a black card stock.  All of the cards had pearls or jewels/gems of some sort to give them some sparkle.


See you next time!  Until then, Imagine, Create, and Enjoy!

Thursday, July 4, 2013

Another Card File

Previously I had made a Dates to Remember card file here.  The idea was originally featured over at Scrappin Cats blog.  I decided my girlfriend also needed one of these handy files for the other part of her birthday gift.  It was fun creating it...I used a K&Company Susan Winget Meadow paper pack.  It is a beautiful garden variety pack of papers I picked up at Michael's on clearance and it has made some wonderful cards and other projects.  I had saved the template I'd previously made for the individual months of dates and once all of the envelopes were covered with the Meadow paper I printed the date lists, inked around the edges and fixed those on each page.  I printed the months of the year on white card stock, used a punch to punch them out and after inking them, affixed them to the flap of each envelope.  I added a little bit of bling, both jewels and pearls under each of the month names.

For the back of the card file I used two cereal boxes cut to 6 x 9" the same size as the envelopes and covered it with white card stock and then matched the rest of the paper in the pack.  I put a two hole punch in the top and put two rings into the card file.  I covered the rings with a variety of yellow and green ribbons from my stash.

For the front of the file I printed the word Celebrations on card stock and then used a star punch to punch the edges of the paper.  I centered the piece in the middle of the front cover.


To complete her gift I added a small supply of hand made cards I had in my stash.

Until next time, Imagine, Create, Enjoy!

Tin box makeover

I had picked up these lovely little metal tins for a great price while shopping for another craft project.  I thought they would make a great gift project.  Another friend's birthday last month.  She loves when she receives my craft gifts...she's a big fan of my homemade goodies and I enjoy her delight when she opens them.  The tin's measurements are 5 1/2" by 3 1/2" wide and 1 5/8" deep.  I had used some papers from DCW's Tradewinds paper pack.  The piece I chose for the top of the box had two of these beautiful butterflies one at the top of the page and one of the bottom.  I'll get two different boxes out of that particular page.  I cut the strip to fit the top and rounded the corners.  I attached it to the top of the box with a tape runner after inking the edges with some Tim Holtz distress ink.  I cut the paper to showcase the butterfly which left some space on the lower right corner of the lid.  I wanted to personalize the box for my friend so I pulled my chipboard letters out, found a "J" and painted it with some copper paint I had.  After it dried I added some pretty pearls to the ends of the swirls of the letter.   I took some copper and gold threaded ribbon from my supply and glued that around the edge of the lid.  I also glued it around the inside rim of the box.  That was an accident, as I realized afterwards that it would make closing the box a challenge.  I would not do that the next time.  Around the outside of the tin I cut two strips to band the box; because there were two seams on each long side of the box I cut two small pieces of the ribbon I used around the lid edge to cover the seams on the band.  My adhesive of choice was E6000 to make sure everything stuck properly.  I also cut a piece that matched the lid piece and used it to line the bottom of the inside of the tin.


Once the box was all finished I started making matching note cards for the tin. I cut strips of natural card stock for the back of the card and pulled some of the other patterned paper from the Tradewinds paper pack.  I used the corner rounder to round the corners of the card and then cut a small square of the natural card stock.  I stamped the word "thanks" from a StampinUp! stamp set on the square and mounted it with foam tape to give it some dimension.  All together I made eight little cards to fit in the tin.
I decided the set needed some matching envelopes.  Since these were not standard sized cards I made some envelopes out of the same card stock I used for the cards.  When they were finished I stamped my girlfriend's initials on the back flap of the envelope to add a little flair.

Here is the completed set.  They turned out quite nicely.  Since I bought a few of the tins ($1.75 each online) I will be able to make a few more gift sets.  These would be cute with a Christmas themed paper, maybe little Christmas thank you notes!


 Off to do some more crafting!  Go ahead, Imagine, Create, Enjoy!


Saturday, February 18, 2012

Birthday Card

My future daughter-in-law's birthday is coming up so I wanted to make a special birthday card.  I utilized the idea found here. I utilized some of my papers from My Minds Eye paper pad I picked up a couple of years ago.  I added some brown satin ribbon along the left side and then utilized my Tim Holtz Tattered Florals die to add the flower.  Rather than use different colored papers on alternating flower pieces I used all golden card stock.  In the middle I added a green brad and a green jewel on the top of the brad.  Since the color theme seemed to be gold, green, brown tones, I added the sentiment Celebrate on the bottom in Vintage Photo distress ink also by Tim Holtz.  Inside I stamped a Happy Birthday sentiment.

Simple, but cute and I like the flower...I think it gives it a nice focal point. Hope Dana likes it too!

Until next time, Imagine, Create, Enjoy!

Friday, January 20, 2012

Birthday Cards

Earlier this week I shared some gift card holders I made for upcoming birthdays.  To complete those gifts for the niece and nephew I did matching cards to go with them.  The card on the left is for my nephew.  I continued the rock and roll theme with some of the leftover scraps from the Rock and Roll paper.  I mounted that on some matching turquoise blue paper and mounted that on white card stock.  I then used another piece of the turquoise paper, cut a frame with a Spellbinders die, stamped the words You Rock on it and used black embossing powder to make it pop.  I mounted that on the flip side of a scrap of the Rock and Roll paper and then cut out one of the guitars from the scraps from the giftcard holder paper and mounted it on the tag with foam pop dots and then used pop dots to mount the sentiment on the front of the card. 

Nephew's Card


For my niece's card I used some of the leftover paper with water lilies on it, mounted on lavender paper and then on white card stock.  I used my Sizzlets Decorative Label die to cut a sentiment block on purple card stock.  I stamped Happy Birthday on it in purple and embellished with some green pearls.  Because this paper had some sparkles in the design of the paper I didn't add much extra bling. Both cards have birthday wishes stamped inside.  Here is each card with the matching gift card holder ready to be sent with their gift cards tucked inside.


Niece's Card


Catch you next time.  Until then, Imagine, Create, Enjoy!


Monday, January 16, 2012

Birthday Gift Card Holders

Well the holiday's are over and the new year begun and now starts the rounds of birthday cards, and I'm just talking about my family!  This month we start out with a niece and a nephew just a week apart.  During the Thanksgiving weekend sale I picked up a new pocket die from Sizzix on a deal I just couldn't pass up, about 70% off.  I loved the original selling point of the die which was for Christmas gift cards.  Unfortunately, I didn't get around to making any of those for the holidays.  It is an extended die which required an extended crease pad which I could not find anywhere in town so had to send away for it.  Since I didn't get that ordered until after Christmas, I decided to use the die for my upcoming birthday gifts.  The first ones are for guys, I had some rock star paper and some paper with guitars on it by Best Creation, Inc., what a perfect paper background for a guy gift card.  The paper with the guitars I used for the one of the holders didn't require much additional embellishment as it was glittered up, so I just added a party hat from my Doodlecharms Cricut cartridge in complimentary colors.  Since the embellishment was really a tag, I added a sparkly silver brad on one and a charcoal black on the other one.  The only thing to remember when working with paper with lines and a definite pattern direction is to make sure your paper is going in the correct direction when using the die!  I also decided to make a envelope to go with the guitar gift card holder.  It is not one you would be putting in the mail, rather hand delivering it to the recipient.  I used my Plaintain Schoolbook Cricut cartridge and cut the envelope from the rock star paper.  I attached a small tag in the upper left corner to write the recipients name.


I then made a couple more in just solid colored blue and neon green paper.  I used the Happy Birthday embossing folder by Cuttlebug and added the party hat embellishment cut on my Cricut.  On the blue card I spritzed some silver Perfect Pearls to make the paper shiny and to match the silver glitter paper on the back part of the card holder.  I left the green one kinda plain, still embossed and spritzed the hat overlay to give it just a little pop.  I didn't want to go to overboard on the glitzy on these solid colored ones figuring they could be for either a guy or a gal.  If I do use one for a gal, I'll just add a little bling to jazz it up.


For the girls gift card holders I went with some floral papers I had from K&Company, the Susan Winget collection.  I've gotten such a great amount of projects from these paper pads it's just amazing.  For the green one with dragonfly's I added some paper embellishments after embossing the folder with the Happy Birthday folder.  Ont the blue folder I used an embellishment and added a small tag with a little bling.  For the last one I used some of lilies paper from the same pad, added some of the coordinating puffy embellishments and a small lavender tag with a green pearl brad for the recipient's name.


I can see gift cards holders for all sorts of holidays and occasions in my future!  Imagine, Create, and Enjoy!


Wednesday, August 17, 2011

Scrap Birthday Cards

These scrap cards have been in the works for a little while.  I had seen the banner idea in a card making magazine earlier in the spring.  I wanted to recreate it and here is my attempt.  I've added two small brads at the corners and used sewing thread as the string to hang the Party banner.  I then stamped the birthday wishes on the front of the card and added another birthday wish inside.

The second card started out as another banner card attempt but I changed my mind once I started working with it.  The scraps are leftovers from another project and I used part of the patterned paper with the sentiment in the lower right corner of the card.  I stamped the Happy Birthday on the matching pink cardstock and added some pink pearls underneath it.  Inside I stamped a different birthday wish.

Imagine, Create, Enjoy!

Monday, May 30, 2011

Cards – Father’s Day and Birthday

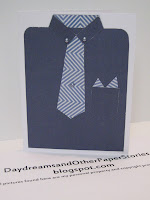
Yesterday I spent some time making more cards…Father’s Day is fast approaching and more guy birthdays!  I always seem to struggle with guy birthdays.  Anyway, today I have CASE’d my good friend Tina’s Father's Day offering.  For Father's Day I did one of each of the shirt and fishing vest offerings.  I changed them up a little by using solid colored paper for the guy’s shirt and a patterned tie and handkerchief for the pocket.  These papers are from the Tradewinds paper pads from DCWV.  For the fisherman’s vest I used Kraft paper and inked up the edges with Vintage Photo ink from Tim Holtz.  I used a circle punch for the sleeve holes and the same for the collar indent on the front of the vest.  I added some twine in the pocket with a swivel attached to the end.  In the other pocket I put a small fish hook attached to some thread hanging off the pocket.  Thanks to my hubby for letting me raid his tackle box!
Father's Day

After finishing these cards I decided to make some for the guy birthday’s coming up.  I created the shirt card once again with papers from the Tradewinds paper pads and added a birthday sentiment inside.  When I was working on the earlier fishing vest it reminded me of a card sentiment stamp I had that goes perfect with the fishing vest idea…so a couple of more vests later I have cards with happy birthday stamped on the outside and on the inside the sentiment  “It’s your day…catch all the fun you can,” great play on words for the fishing concept!  Again, I added swivels and small fish hooks to the pockets to add more authenticity to the cards.  
Shirt Birthday Card

Fishing Vest Birthday Card


As I was finishing these up…I realized you could make the fishing vest for a gal also, I know some gals who also enjoy fishing…hmmm…another project for the next time!

Imagine, Create, Enjoy!