Showing posts with label DCWV. Show all posts

Thursday, July 4, 2013

Tin box makeover

I had picked up these lovely little metal tins for a great price while shopping for another craft project.  I thought they would make a great gift project.  Another friend's birthday last month.  She loves when she receives my craft gifts...she's a big fan of my homemade goodies and I enjoy her delight when she opens them.  The tin's measurements are 5 1/2" by 3 1/2" wide and 1 5/8" deep.  I had used some papers from DCW's Tradewinds paper pack.  The piece I chose for the top of the box had two of these beautiful butterflies one at the top of the page and one of the bottom.  I'll get two different boxes out of that particular page.  I cut the strip to fit the top and rounded the corners.  I attached it to the top of the box with a tape runner after inking the edges with some Tim Holtz distress ink.  I cut the paper to showcase the butterfly which left some space on the lower right corner of the lid.  I wanted to personalize the box for my friend so I pulled my chipboard letters out, found a "J" and painted it with some copper paint I had.  After it dried I added some pretty pearls to the ends of the swirls of the letter.   I took some copper and gold threaded ribbon from my supply and glued that around the edge of the lid.  I also glued it around the inside rim of the box.  That was an accident, as I realized afterwards that it would make closing the box a challenge.  I would not do that the next time.  Around the outside of the tin I cut two strips to band the box; because there were two seams on each long side of the box I cut two small pieces of the ribbon I used around the lid edge to cover the seams on the band.  My adhesive of choice was E6000 to make sure everything stuck properly.  I also cut a piece that matched the lid piece and used it to line the bottom of the inside of the tin.


Once the box was all finished I started making matching note cards for the tin. I cut strips of natural card stock for the back of the card and pulled some of the other patterned paper from the Tradewinds paper pack.  I used the corner rounder to round the corners of the card and then cut a small square of the natural card stock.  I stamped the word "thanks" from a StampinUp! stamp set on the square and mounted it with foam tape to give it some dimension.  All together I made eight little cards to fit in the tin.
I decided the set needed some matching envelopes.  Since these were not standard sized cards I made some envelopes out of the same card stock I used for the cards.  When they were finished I stamped my girlfriend's initials on the back flap of the envelope to add a little flair.

Here is the completed set.  They turned out quite nicely.  Since I bought a few of the tins ($1.75 each online) I will be able to make a few more gift sets.  These would be cute with a Christmas themed paper, maybe little Christmas thank you notes!


 Off to do some more crafting!  Go ahead, Imagine, Create, Enjoy!


Tuesday, September 6, 2011

Christmas Mini Clipboard

While in the Dollar Store over the weekend I was wandering around, after picking up what I'd gone in for, and happened upon these little 6" x 8" clipboards.  I thought it would make a really cute gift idea...didn't know what exactly but picked it up to give it a try.  Today I took a vacation day to extend the long weekend just to play and craft, and so decided to work on the clipboard.  I pulled out different paper pads, trying to figure out what I wanted to do with it.  Well with Christmas approaching, my mind is on what to do for Christmas gifts.  So...I marched over to my paper stash and grabbed my Christmas paper pads from last year and started leafing through them.  I found this cute paper in my DCWV Winter Wonder paper pad and got started.  I chose the patterned paper with the polar bear because I thought it was cute and appropriate for the person I'm thinking of gifting this to.  I cut it down to size for the front of the board and on the back side I used one of the other silver and white sparkly snowflake papers from the same package cut down to size.  After adhering the paper to the front and back, I took 1/8" wide blue ribbon edge with silver that I picked up last Christmas from Michael's and adhered it all the way around the edge of the board.  When I had picked up the Winter Wonder paper at Jo Ann's, I had also found a package of matching stickers and embellishments to go with the paper.  I pulled some of those from the package and added to the back of the board.  I also added some Jolee's snowflake embellishments with bling and added some additional blue bling I had in my stash. At the top of the board on the clamp, I added two pieces of silver ribbon on each side of clamp.  To finish it up I added a small pad of plain card stock stamped with Christmas words in the lower right corner.  On top of that I tied a small framed Christmas sentiment "May the magic of Christmas be yours this season."  I cut the frame using my Cuttlebug fancy tags die and threaded it with 1/8" white with silver edges ribbon and tied it around the clamp, centering it over the small notes. 

Since I had leftover paper from the front and back of the clipboard, I used the other side of the polar bear paper to create a small matching photo book.  It it is very simple, I had two good corners of the original paper left with snowflakes, so cut those down to a 5 3/4" x 4" front and back cover.  For the inside pages of the book I used some matte silver card stock which I cut down to 5 1/2" x 3 1/2" wide.  I didn't add embellishments to the pages as I didn't want to limit what the recipient could do with the book.  On the outside I added the Let It Snow sticker and a Jolee's snowflake with some bling.  I punched two holes in the left side of the book and used snowflake brads for the holes.  I then added a couple of rings through the brads and covered them with ribbon in blue and silver.  To make the book a little more sturdy, I used my EKSuccess corner punch to punch some corner reinforcements from the silver snowflake paper used on the back of the board.  I then used them on all of the corners, front and back, inside and outside.  Once pictures are added to the book I'm sure it will stand up nicely.

Finally, the finished product with the plain stamped card stock in the middle of the clipboard under the framed sentiment.  All in all, I'm satisfied with the finished product and will probably pick up a few more of these dollar gems to do up some more Christmas gifts.


Until next time, Imagine, Create, Enjoy!

Monday, September 5, 2011

Sizzix

Last Christmas I used some gift cards I received and purchased a Sizzix machine.  I've played with it here and there, but nothing serious until this past weekend.  I've been seeing a lot of cards with embossed layers and find they are beautiful, fun and unique!  I needed a birthday card for my friend so last Sunday my sole purpose was to use my Sizzix and come up with something pretty!  I think I've succeeded!!  This first card is my friends birthday card.  I used one of my Sizzix folders (didn't write the name on it and threw away the packaging!) and chose a pale blue for embossing.  I added a darker blue background as contrast.  I then pulled some ribbon from my stash.  It has wired edges and is actually a series of variegated purple hues, but I think it went quite well with the blue card stock.  I added a lavender butterfly with some bling in the upper right corner using my SU! Butterflies Embossing Sizzlet. On the bottom right I used my Cricut to cut my sentiment piece and background, then inked, stamped, blinged up and mounted my sentiment.  I added a matching sentiment inside on white card stock. 


Next I played with the Allegro Cuttlebug folder.  I love music, if there isn't a movie I'm watching while crafting, the music is on!  This card stock was a kind of rustic red or country red.  I mounted it on a cream card stock.  I liked the look and decided to make it a little elegant with some gold ribbon along the edge.  I cut a sentiment block with my Cricut out of cream and added a pretty sentiment with a butterfly in the corner from one of my stamp sets with a touch of bling on the butterfly and along the bottom of the sentiment.  I inked up the edges with the Tim Holtz Fired Brick ink pad.  I left the inside blank so the sender can write a personalized note.


This card is a birthday card, with the flowery look to it I'm thinking it's a girl's card.  I used the Happy Birthday Cuttlebug folder with a burgundy colored card stock mounted on white.  I add a sentiment square in white card stock in the lower right corner with a small stamped flower and some matching bling. I then added some flowers in the upper left corner with a heart brad in the middle and a little bling on top.  The inside is stamped with Happy Birthday.

Finally, I did a thank you card using the Thanks Cuttlebug folder and burgundy card stock, again on white.   Using the Tim Holtz small rosette die, I added a mini paper rosette on the front with a gold patterned paper from the DCWV Tradewinds paper stack.  I think it punches up the burgundy a little and gives it some dimension.  Inside I stamped "thanks a million and added a schwoopie in the lower right corner with a little bling.  I stamped it with Tim Holtz Fired Brick ink. 

I think I'll be using my Sizzix a lot more in the future!  Imagine, Create, Enjoy!


Monday, May 30, 2011

Cards – Father’s Day and Birthday

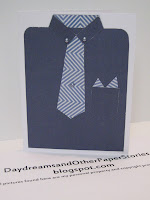
Yesterday I spent some time making more cards…Father’s Day is fast approaching and more guy birthdays!  I always seem to struggle with guy birthdays.  Anyway, today I have CASE’d my good friend Tina’s Father's Day offering.  For Father's Day I did one of each of the shirt and fishing vest offerings.  I changed them up a little by using solid colored paper for the guy’s shirt and a patterned tie and handkerchief for the pocket.  These papers are from the Tradewinds paper pads from DCWV.  For the fisherman’s vest I used Kraft paper and inked up the edges with Vintage Photo ink from Tim Holtz.  I used a circle punch for the sleeve holes and the same for the collar indent on the front of the vest.  I added some twine in the pocket with a swivel attached to the end.  In the other pocket I put a small fish hook attached to some thread hanging off the pocket.  Thanks to my hubby for letting me raid his tackle box!
Father's Day

After finishing these cards I decided to make some for the guy birthday’s coming up.  I created the shirt card once again with papers from the Tradewinds paper pads and added a birthday sentiment inside.  When I was working on the earlier fishing vest it reminded me of a card sentiment stamp I had that goes perfect with the fishing vest idea…so a couple of more vests later I have cards with happy birthday stamped on the outside and on the inside the sentiment  “It’s your day…catch all the fun you can,” great play on words for the fishing concept!  Again, I added swivels and small fish hooks to the pockets to add more authenticity to the cards.  
Shirt Birthday Card

Fishing Vest Birthday Card


As I was finishing these up…I realized you could make the fishing vest for a gal also, I know some gals who also enjoy fishing…hmmm…another project for the next time!

Imagine, Create, Enjoy!

Sunday, May 15, 2011

More Birthday Cards

May is another one of those months for my family...lots of birthdays along with a number of friend's birthday's, Mother's Day, graduations.  So...this weekend has been about birthday card making and attending birthday parties.  I needed a couple of girl birthday cards and some guy birthday cards.  Here is what I came up with for the gals.
This one uses paper from the Far East paper pad by DCWV.  I inked around the edges of the card and then  mounted this smaller square on the card stock after stamping the sentiment...I added a butterfly with some bling on the front. Inside I cut a smaller piece of the butterfly paper from the Far East pad and the took another piece from the pad and cut the two rosettes with my Tim Holtz rosette die.  Love that die!

Here is the next one.  I used some paper from a 4x6 pad of the K&Company Susan Winget's Spring Blossom specialty pad.  I added birthday wishes on the outside, some bling to the printed paper flowers,
and then a paper flower of maroon and yellow, a die cut butterfly below the stamped sentiment, with maroon ribbon tied around the spine of the card.  Inside is a birthday wish, a schwoopie on the bottom and another one of those fun rosettes.  I added a pop up butterfly accent along with a small maroon ribbon there to complement the outside ribbon.  Since the die cuts two rosettes, I put the larger one on the outside of the envelope to spiff it up!

Now on to the guy cards.  I used Kraft stock for two of the three cards and then some ivory card stock that I inked up around the edges to give a kinda grunge look if you will.  The first one I also used my Cricut for the sentiments on the outside.  It was fun mixing and matching from my Cricut cartridge.
These next two are similar, I liked the idea for the first one and decided to duplicate it a little on the next one.  I used paper from the new Tradewinds stack by DCWV.  It has papers that will go well for both guy and girl cards.  Can't wait to make some more.

The card on the left used ivory  card stock the one on the right Kraft paper.  I used the Cuttlebug slider die cuts to make the little sentiment tags to put on the ribbon.  Used brown ribbon, and then attached the buttons from my stash.  All in all, I think it was a pretty productive weekend.  I hope you enjoyed today's post.  Thanks for stopping by, have a great week.
Imagine, Create, Enjoy!

Sunday, April 10, 2011

Journal/Planners


Black Friday Shopping
Gal Pals

So last fall, a friend of a friend and fellow blogger Cathy –Scrapping Cat! took the journal idea to a whole new level by making it into a holiday planner with beautiful Christmas papers.  Well I just had to give it a try as soon as I saw it!  They would be a gift for my Black Friday shopping gal pals!  These turned out great and very beautiful…the papers and embellishments out there today are wonderful. These particular papers are DCWV The Christmas Combo stack. 


Christmas Planner and Mini Book

I also found mini composition notebooks at the Dollar Tree store!  Love that place!  I used leftover scraps to doll up a small version as a little shopping list notebook, or place for notes, or whatever!  Just the right size for the pocket or pocket book!  

Everyday Planner

These have tabs at the top of the book with 4 different focus areas for the holidays: to create, to bake, to buy, to do, all subjects that Cathy had used in her original design.  Once I had done a few of these I was chatting with a co-worker on how they could be made for everyday use and what the tab subjects would be. We came up with the following subjects: Shopping, To Do, Appointments, Bills. I then made one that can be used for everyday use.  I used my Cricut to cut some hearts of the matching papers from My Mind's Eye "Home" paper stack, added some texture to the hearts with a dots embossing folder, cut a label for the front, and used my EKSuccess edge punch to give it some swirls and added a little bling in the corner.  This was a birthday gift for a sweet friend who is an expert list maker!

So this idea as Cathy mentioned in her blog lends itself to a variety of adaptations, daily planners specifically tailored to individual needs, travel planners, etc.  You get the idea.  Soon I’ll be posting another take on this traditional idea that my niece came up with.  First I need to send her the finished product!  Until next time… Imagine, create, enjoy!