Showing posts with label Tim Holtz. Show all posts

Friday, April 18, 2014

Headbands

My daughter-in-law Dana found here an idea on Pinterest for an elastic headbands station to have at her shower.  She liked this idea because it allowed the guests to personalize something for baby Laila during the shower.  I set about figuring out how to get it done! After visits to JoAnn's, Michaels, and Hobby Lobby I found all the requisite supplies mostly on sale.  Luckily the main part, the stretchy headband materials was sold by the spool at Hobby Lobby and I caught it on a sale day.  I was able to pick up about six different colored spools and ended up getting about six headbands per roll.  I cut them in about 12-14" lengths and sewed the ends together.

In addition to the headbands I picked up matching colors of felt, fabric flowers, pre-made bows, jewels, small butterflies, and small button shapes. The flowers were different colors and patterns (polka dots), different styles (zebra print), mostly daisies, and some other flowers.  I took and pulled off or cut off the flowers from the stems and then hot glued them on the bottom to make sure the centers and the flower layers stayed together.  When I looked at putting them on to the headbands though I felt they weren't going to lay flat on the headbands and would be too heavy for the headbands.  I looked at the original idea and saw some felt circles in the example so went back and picked up some matching felt.  I took my Tim Holtz Tattered Florals die and cut the felt using the largest flower on the die.  I cut about 6-8 of each color so they could be used to glue the flowers on and then glue on to the headbands.

So we set up a separate area at the shower with hot glue guns and all of the different components laid out on the table and told everyone at the beginning of the shower where everything was located and invited them to make their way into the dining room to create their own special gift for baby Laila.

To make sure Dana and Kyle knew who had created each of the headbands, I cut tags with my Cricut and cut 12" lengths of thin ribbon (1/8" wide).  On each of the tags I stamped the word From: on one side and then asked each Guest Headband Designer to sign their creation and tie the tag to the headband they made. The guests were eager participants and enjoyed creating some really pretty headbands for Laila.  We can't wait to see her wearing each and everyone of the gifts.

Here is a group shot of all of the completed headbands.  They really turned out nicely. She will be quite the styling little girl!  Keep on Imagining, Creating, and Enjoying every day!


Monday, April 14, 2014

More Butterflies!

My son Kyle's baby shower was held at his in-laws home out in Courtland on a Saturday afternoon.  The weather in March in Northern California (similar to most areas of the country) can range from cold, wet, rainy and 30 degrees to warm, sunny, dry and 75 degrees.  Lucky for us we got the warm, sunny, dry, close to 75 degree weather!  We were thrilled as we had decided to have the shower outside.  The in-laws home in Courtland sits on a large piece of property and there is a long driveway with shade trees and ample space in front of the garage area so we decided to utilize that area.  We rented round tables, tablecloths and even a EZ-Up cover.

Since the other decorations were leaning in more of a pink/brown theme, we carried that through to the rest of the decorations.  Chocolate brown table cloths, pink burlap chevron runners on the tables with strips of pink mesh in differing shades running down the middle.  Since we have tons of calla lilies in our yard, I volunteered to bring vases full of the lilies for table centerpieces.  Dana's sister Taylor worked some magic with bows on the vases and adding accents to the tables.  I followed through with the butterfly theme by cutting some more of the butterflies I had previously cut for the wands but in a  pearl pink instead of a glittery pink.  I cut them out of an old file folder and then covered with the pearl looking paper.  I had some leftover paper from my large rosette's on the other project as well and used my Tim Holtz rosette die to make some smaller rosettes.  I picked up some floral wire stems and attached them to the back of the butterfly with hot glue and a small round paper circle to cover up the end of the wire.


Back to the front of the butterfly.  I took the small rosette and hot glued it to the front of the butterfly.  Then I used some more of the pretty pink jeweled brads from the last project and added that on top of the rosette. When I cut the calla lilies for the centerpieces, I popped a couple of those butterflies in each of the vases to carry the theme through.

Imagine, Create, and Enjoy!

Wednesday, April 2, 2014

Butterfly Fairy Wands!

My late friend Jayne was a wonderfully creative person who was inspired by the most unusual things and made some really beautiful and unique paper pieces. One of the things she had made was a decorative item for her niece's baby shower, shown here.  It is a butterfly fairy wand!  She had a butterfly die she used to create the base for the wand using some chipboard which she then covered in scrapbook paper on both sides.  Once she did that she cut some rosettes with the Tim Holtz rosette die. This die has two sizes of rosettes, pre-scored so all you do is cut with your Sizzix or Vagabond and then crease and glue together.  The die even has a circle to cover your glued spot in the middle of the rosette.  She put one rosette on each side of the butterfly.  Before she affixed the larger of the rosettes, she painted the stick a silver color and then wrapped it in some ribbon we found in the dollar bin on one of our craft shopping lunches.  She also backed the larger rosette with some of the ribbon and added some ribbon tendrils.

I loved the idea and have used it as inspiration to create my own set of fairy wands for Laila Olivia's baby shower.  The butterfly die I have is a little different in that it is more solid with only a couple of cut outs on each wing.  I decided to go with a (what else) heavy, pink glitter card stock for my butterflies. Liking Jayne's original idea of rosettes I did a reverse to her design and made the rosettes larger than the butterfly by using my Cricut and the Ribbons and Rosettes cartridge and cut these large rosettes with a small heart border. I then cut the smaller rosettes with the Tim Holtz die and used the smaller one on the front of the butterfly.

For the wand portion I used pre-cut dowels in 12 inch lengths you can purchase at any craft store.  I then painted them in a pearly white paint I had leftover from my "Grandkids" project.  I then grabbed a number of different rolls of ribbon from my stash...mostly pinks and browns, some I had also picked up to match the polka dot theme we had going on the cake ribbon and started cutting different lengths.  I hot glued 5 of these differing lengths to a small 3" strip of ribbon and set aside.  Once the paint on the wands was dry I wrapped each wand from top to bottom in a variety of ribbon allowing some of the pearly paint to show through.  


Next I hot glued the ribbon band to the back of the butterfly and then hot glued the wand on the back as well.  Once dry, I hot glued this piece to the large rosette and let them set.  I had picked up some brads, a variety pack of approximately 3/4" size in two shades of pink.  I took the brads and snipped off the prongs on the back with my wire cutters and then hot glued the brad to the top of the small finished rosette.  The brad became the center of each rosette.  Finally I hot glued the rosettes on to the front of the butterflies.


Here is a close up of my finished "Fairy Wands."  I made enough to use as part of the decorations at the shower and once the shower was over my daughter-in-law kept some for Laila's nursery and the rest were given to their nieces who attended the shower.  I'm very proud of my little creation!  They were fun to make and share at the shower.


Go on, Imagine, Create, Enjoy!

Monday, October 22, 2012

Wreaths

Hi there, it's been awhile...there have been big life happenings in my little corner of the world, but finally feel like I'm getting some of my time freed up again.  I have a small group of friends who try to meet once a month for a craft night.  It's a pretty eclectic group of ladies with a wide variety of styles and tastes.  We started the group to encourage ourselves and each other in our crafty pursuits.  We wanted to specifically set aside time for ourselves, visit and touch base with each other and hopefully accomplish something during that two hour window, one night a month.  We have no set rules, we don't require everyone do the same project, we put out suggestions and usually bring our version of the supplies to create our project.  Something unique and different for each of us.

Have we been successful you may ask?  Depends on how you rate success!  Have we met every month, nope...but in the months we have met, we have done what we set out to do, we've visited, crafted, and most every one of those times, made something new or different, something outside our comfort zone, something we'd seen on Pinterest or somewhere else and wanted to try, and done it with enthusiasm and most importantly...enjoyed ourselves.  For September's evening everyone decided they wanted to make wreaths.  Because we don't have strict rules or a set format everyone did something a little different.

I have a lovely Fall wreath that I had made a few years ago so decided to focus on a wreath for Halloween.  My design utilizes a couple of different design ideas I had seen on Pinterest.  I tried to use only supplies that I had at my house but ended up buying a couple of items as noted.  The first idea was to use wire insulation tubing from Home Depot (.97 cents) to create the wreath.   I cut the tube to the length I needed to create approximately a 15" round wreath.  I duck taped the ends together and then wrapped the entire wreath in black tulle.  I found some black 1/2 inch wide ribbon with glittery dots in Halloween colors at JoAnn's and wrapped that around the circumference of the wreath.  I found the same kind of dotted ribbon in 2 1/2" wide and made a bow for the top of the wreath.


The oval at the top was cut from an old file folder 2 times (recycling at it's best!) and covered in orange paper.  I used a strip of black paper and my Martha Stewart Drippy Goo punch to have some black goo dripping from the top of the oval.  I bought "eeire" words from K&Company, this one says Boo! and has a bunch of glittery, swirls and such.

For the main part of the wreath I decided to go with rosettes!  My eyes are always bigger than they should be and I don't often take into account all the work involved in the particular design I've decided on.  I folded a lot of rosettes!!! Lucky for me I had the Tim Holtz rosettes die and the Ribbons and Rosettes Cricut cartridge which had a rosette pattern with spiders on the edges.  This helped a lot!  I used a variety of patterned Halloween paper I had at home as well as plain card stock in the standard Halloween colors, purple, black, orange, grey. After cutting all the rosettes I folded and glued and folded and glued, and folded and glued some more...you get the idea!  I started arranging the rosettes around the wreath, stacking and hot gluing.  I found a small bag of colorful little spiders that I also added as accents.  I then had enough of the 1 inch dotted ribbon left to make a hanger which I looped around the wreath and tied in a bow at the top.


Fun times!  Cya later!  Imagine, Create, Enjoy.


Thursday, May 10, 2012

Mother's Day

I have a new Tim Holtz Alterations die, Hanging Sign.  As you can see from the picture, it looks like a quaint country sign at a cute little bed and breakfast inn surrounded by a field of flowers.  There was born my idea for my Mother's Day card. 

I chose to use white card stock for the card base, actually I used the 6 1/2 x 5" pre-made card base in the packets you can get from Michaels.  I decided to make it a landscape orientation card and chose one of the flower papers from the K&Company, Susan Winget Botanical paper packet.  It has a lot of lavenders, blues and other pastels in the color scheme.  I utilized that for my main background and then cut the sign post from brown card stock.  For the sign itself I chose an off-white paper with a lightly speckled background.  I printed Happy Mother's Day on it using Word and cut it out with the die.  I inked around the edges with Tim Holtz' vintage photo ink pad, added some lavender bling under the sentiment and had some butterfly and floral embellishments that went with the papers and used them on the sign. 

I wanted the sign to be free swinging, like a true sign would be, so I grabbed some jump rings I had and used those to hook the sign to the sign post.  Around the top edge of the card I put a pretty lavender ribbon around and tied in a square not.  Inside the card I stamped the sentiment "How dear to the Heart is a Mother like you..." and added one more butterfly to accent the inside. 

That's a wrap...more fun cards to come...wedding showers, baby showers...more projects!  Imagine, Create, Enjoy!

Sunday, March 18, 2012

Magnetic Bulletin Board

A small group of gal friends gather once a month to craft and share ideas.  Our March meeting was fast approaching and we were looking for a project and recently while perusing Pinterest I found this lovely project here and suggested it as our project for the month. It is a magnetic bulletin board using a standard cookie sheet, patterned scrap booking paper and cork board.  The instructions given at the Scrap Yard Chicks website are very thorough and she provides a complete supply list as well. 

What was nice about this project was that I had the majority of the supplies at home, I just had to pick up a cookie sheet, cork board, and some magnets.  The dollar store was my quick stop for the cookie sheet and while there I found some butterflies for what else a $1.  There were 3 in each package and various colors so I picked up a couple for my stash.  I tried the office supply store for the cork board and ending up finding it at Michael's.  They had a pack of 4 -12" squares which ensures I have extra pieces of cork board for other projects that I'm sure will come up. 

I'm not going to go into all the details of the making of sheet as you can find them over at the Scrapyard Chicks, but I will explain my changes to their design.  The sentiment across the top of the cookie sheet can be changed up to whatever you want, thus allowing many variations on this idea.   I decided to use my Cricut machine and the cartridge Graphically Speaking and chose the words "Life is Good."  I liked the idea of counting my blessings and having a positive statement on my board.  I cut one in black card stock and then a pink pearlized card stock at the same size.  I then cut a mat from a sheet of Tim Holtz' Grunge paper, more lightweight than chipboard but with some substance.  I mounted the pink on the grunge paper and inked up the edges with Tim Holtz's Vintage Photo distress inks, then added ribbons and buttons on top of some of the letters.  When I mounted it I used pop dots to give the words some dimension and left the black version of the word as a shadow effect which you can see when you are closer to the board.  I put some of my buttons on magnets as well as the flowers.  I printed my calendar smaller so that there is more room on the board to stick up items with magnets.

The original instructions called for one cork board square cut down to fit the cookie sheet.  I found though that because most push pins are longer than conventional tacks that one layer was too shallow; so, I decided to double the cork board.  I inked around the edges with Tim Holtz's Vintage Photo and Crushed Olive on the top piece and affixed the two pieces together. Then to hide the look of the cork board edges I took a length of the same ribbon I used on the cookie sheet at the seams, to wrap all the way around the edges of the cork board.  I took and glued the conventional tacks on the back of flowers with a button center and also to the back of the butterfly.

So when the ladies gathered to work on their cookie sheets they had some different takes on the original idea.  Some of them used Gesso or Mod Podge to create an opaque paint look around the edges and added some color to that.  Others used some clear contact paper to make a white board only with patterned scrapbook paper!  Great variations on the whole idea!  I can see this as a gift for a bride to be or a grandchild with a great variation on the theme, sports for kids or guys, hunting or fishing for men for Father's Day gifts, or maybe even an advent calendar for the holidays!

Here is a look at the complete project.  I punched two holes in the lip of the cookie sheet with my cropadile and added grommets and then threaded the grosgrain ribbon through the grommets and tied at the top.  I'm going to use a wreath holder over the edge of my cube at work to hold the board.

Until next time, Imagine, Create, and Enjoy!


Monday, February 20, 2012

Card Gift Set

I was playing with my Cricut today and looking through some cut files sent by other friends and crafters and found this lovely card box and decided it was time to give it a try.  I've been using the papers from My Minds Eye and made this cute card holder.  I used a heavy white card stock and then used a goldenrod for the first layer and one of the patterned papers with fleur d'lise on it.  I think it turned out really nice.

I then put together four different cards to gift in the box along with envelopes.  I'm sure the box could hold five or six cards with envelopes if they were flat cards; mine however, were dimensional with lots of pop dots, ribbons and dimensional paper flowers.  I used my Tim Holtz Tattered Florals die for the flowers and utilized my Cuttlebug tags and labels embossed dies.  I inked them up with Tim Holtz Vintage Photo inks and used my new sentiment stamps from my friend Shawn.  I added some bling, pearls, and ribbon as appropriate. 


That's it for today.  Continue to Imagine, Create, and Enjoy!


Saturday, February 18, 2012

Birthday Card

My future daughter-in-law's birthday is coming up so I wanted to make a special birthday card.  I utilized the idea found here. I utilized some of my papers from My Minds Eye paper pad I picked up a couple of years ago.  I added some brown satin ribbon along the left side and then utilized my Tim Holtz Tattered Florals die to add the flower.  Rather than use different colored papers on alternating flower pieces I used all golden card stock.  In the middle I added a green brad and a green jewel on the top of the brad.  Since the color theme seemed to be gold, green, brown tones, I added the sentiment Celebrate on the bottom in Vintage Photo distress ink also by Tim Holtz.  Inside I stamped a Happy Birthday sentiment.

Simple, but cute and I like the flower...I think it gives it a nice focal point. Hope Dana likes it too!

Until next time, Imagine, Create, Enjoy!

Retirement Cards

There are a number of my co-workers who are retiring in the next month or so...I needed to make some retirement cards.  I had a number of scraps of different travel papers I had used for a couple of different projects awhile ago so decided to use them up for the retirement cards.  These were inspired by cards shown here and here.  The first one I used a stamp that says Bon Voyage, but it is a little difficult to read.  After that I found a clearer stamp with the same words.  This first one I layered three different pieces of travel paper and added a shimmery ribbon at the top.  I then stamped the the Bon Voyage on an embossed tag from a Cuttlebug die.  I inked it up with some Tim Holtz distress ink and added three little bling on the top schwoopie!
On these next two shots I ended up using one of edge punches and gave them either a scalloped edge or a diamond edge on each of the three different patterned papers.  I still added some glittery ribbon below the sentiment and then inked and added the other Bon Voyage sentiment which was a little more readable.  I also added a little bling on the edges and on the bottom one I added pearl accents to the outsides of the sentiment tag.  The single picture shows the detail of the punched edges.  Ribbon is all from sales at Michael's and Jo Ann's Fabrics.


On these final shots I found a Good Luck stamp and utilized the smaller scraps and the idea referenced above from Pinterest.  I had seen this idea previously with bigger squares as a background or base for a larger sentiment but hadn't thought about using it for smaller scraps of paper.  I also added paper flowers I cut using my Tim Holtz Tattered Florals die cut.  I love this die...it is so versatile!  I added some pearl bling and decorative brads.  I only added ribbon to one because the other ones I felt had enough embellishment with the flowers or the sentiment tag in the middle.  These sentiment tags are actually Sizzliet dies their Decorative Label Set #4.

Imagine, Create, Enjoy!

Sunday, January 22, 2012

Valentines Cards

So I've started to work on some Valentine's cards, just playing around and have come up with a few.  These first two used printed card stock by Recollections (Michael's) mounted on red on the left and pink on the right.  For the card on the left I used my Cuttlebug hearts embossing folder on the patterned paper before mounting it on the red paper and ultimately on white card stock as my background.  I cut a small heart, also embossed it with the hearts folder used above, and stamped it You & Me and added some pink pearls to give it some bling.  For the one on the right I used my Tim Holtz rosette die and cut the rosette out of a pretty pink glittered paper scrap from the My Minds Eye paper stack.  I added a couple of jeweled hearts one of which had an arrow through it and some other bling.  I also added the matching jeweled arrow heart in the inside next to the stamped sentiment.

This next card I was trying a different color from the standard pink/red theme usually associated with Valentine's Day.  I layered on top the same patterned paper used above, added a text block on the front with some white pearls and a glittery pink ribbon along the edge.


For this last card I used my Sizzix Texturz plates, the Retro Hearts one and embossed a piece of white card stock.  After cutting it down to the size I wanted I mounted it on pink card stock, I used the Colorbox Cranberry ink pad which looks somewhere between red and pink when sponged onto the raised hearts.  I then used some pink ribbon from my stash that's printed with the words I Love You and hearts.  On the tag (Cuttlebug tags die) I stamped You Complete Me from the My Creative Time, "Turn That Frown Upside Down" set of stamps.  I love her stamps, they are small and petite and you can fit them in small spaces on your projects.  A touch of bling on the bottom of the sentiment tag and we are good to go!


That's it for now!  Imagine, Create, Enjoy!

Tuesday, December 27, 2011

A Different Paperbag Book

I was surfing and saw this video at the Following the Paper Trail blog.  Laura does a wonderful tutorial on a different type of paper bag book.  I was surfing because I was looking for some gift ideas for Christmas and her how to video gave me the idea for the mini book I made for the best friend.  Becky and I have been best friends since high school.  When the idea came to me I wanted to be able to document our lives at different points over the last 35 years.  They would be events of significance and obviously ones of both of us for which I had pictures that I could use for the book.  This is the front of the book.  Becky loves sunflowers so I chose papers from a pad of K&Company papers I had.  Susan Winget is the designer and the paper pack was Spring Blossom.   One of the pages had a bike on it with a basket of flowers where the predominant flowers were sunflowers, just what Becky likes.  By the time I cut down the paper you mostly can just see the basket in the lower left corner and the flowers that cover the front and spine.  I used a matching green leaf patterned paper for the back that coordinated with the background behind the flowers.  I used some Tim Holtz distressed inks to ink up the edges of the pages and give them that shabby chic look.  In the spine I put a grommet to thread through the chain and charms that I added.


For the cover of the book I used the inside of a file folder.  If you have worked in an office you might be familiar with them.  They are red press board file folders with brown cardboard dividers in the middle, typically two or three dividers and are bound with really strong fabric across the spine to endure much handling and many papers in the file.  We were tossing some at work because they were starting to look pretty shabby on the outside, but the inside was still in relatively good shape.  Besides, I was going to cover it all with patterned papers.  I chose to cut the edges of the cardboard insert about 1/4 to 1/2 inch larger than the edges of the paper bags.  This provided about a 1/2 inch or so wide spine to affix the paper bags to.  The pages of the book are paper lunch bags.  I had a number of embellishments, but needed to pick up some others to make the book in its final form. For the front here I used a beautiful yellow butterfly, a metal plate in the upper right corner that says Best Friends and a remember when sticker in the lower left corner.  On the four corners of the book I used some Tim Holtz metal picture corners.  They worked perfectly and will help preserve the corners of the book and keep it from wearing out too quickly.  On the front I added a pretty glass looking button and on the back a grommet through which I tied some thin matching ribbon and affixed a small brass key to the end.  I then wrapped it around the end of the book and looped it around the button to be used as the book closure.

If you visit  Following the Paper Trail you will get the exact directions for how Laura puts together the paper lunch sacks.  I found it to be a very easy tutorial to follow and I made quick work of taping down the bottoms of the bags and attaching them together.  Then I had to choose coordinating papers from the paper pack.  I tried to coordinate colors as it was mostly floral papers that I was using. 

Once I got that done I started pulling pictures.  They start with our high school graduation pictures and proceed through our weddings, baby's, class reunions, trips back and forth, Christmas family photos, and pics of us with our families.  On the inside of the cover is a small envelope with a sentiment on vellum paper.  Our class song...Friends by Elton John was printed on vellum also and mounted to the left of our senior pictures.  The next pages mirror each other with a few pics of our weddings. I tried to mirror the photos, so one of her and her attendants, one of me and my attendants...you get the idea.  You also see ribbons sticking out of the bag pockets.  I put additional pictures on card stock and then put a grommet in the end of each card and looped an organza ribbon through it.

I also found some Jolee's embellishments for graduations, weddings, babies, etc. and added those to the pages as well.  I found that the paper bag bottoms that proved to be the short pages in between the regular sized pages were great for the embellishments or sentiments.  It allowed me to use more photos on the larger pages too.  I also used lots of different stickers and sentiments as well as stamping up and inking other sayings about friends and time and fixing those on the pages.  Additionally I stuck in some bling and more butterflies, because what flower garden is complete without butterflies.  The final two pages and the last pocket were mostly pics of Becky and me through the years.  Talk about a walk down memory lane...and boy the hairstyle and clothing changes in 35 years!  Good for lots of laughs for sure.  Great memories as well!  I hope she enjoyed receiving it as much as I enjoyed putting it together.

Until next time...Imagine, Create, Enjoy!   


Wednesday, October 19, 2011

More Romance

I posted some romantic cards earlier and promised a view of some more of what I sent off.  For the background of this card I used a solid red glitter card stock I had picked up to go with the craft paper from this Recollections Love Letters pad.  It is another 6 x 9 card.  For the card mounted on the front I used the corner of one of the 12 x 12 sheets from the pad with a beautifully glitter embossed flower and some swirls overlaid on music stanzas.  To make the sentiment block on the front of the card I inked up my Cuttlebug frames die and cut the block. This was my first try at inking up the die/embossing folder and I really like how it turned out.  I used Tim Holtz' Fired Brick ink.  I added the sentiment on the front along with some matching red bling on the schwoopie's.  Some of the cards I left blank inside so the sender could write their own note inside.


The next 12 x 12 sheet had this beautifully embossed word Love in the lower corner.  I used that section of the card stock and cut another 6 x 9 card.  Since the card had the word taking up the majority of the front of it I felt like it didn't require much added embellishment.  I added one large crystal bling to the end of the L schwoop and then used my SU! butterfly embosslets die to add a couple of embossed butterflies.

For this card I used the rest of the red glitter card stock for the back and the other section of the music notes paper from above.  I wrapped a gold satin ribbon threaded with a bejeweled red heart around the top of the craft card and affixed it on the back side.  I used the thank you stamp and stamped it in the small block on the faux sewn line.  It fit perfectly in the space provided!  I love it when that happens.  I then mounted the craft card on the glitter card stock.

I am really enjoying this paper stack and thoroughly loved making these cards.  I hope the recipients enjoy receiving them as much as I've enjoyed making them. 

Once again, Imagine, Create, Enjoy.

Monday, September 5, 2011

Sizzix

Last Christmas I used some gift cards I received and purchased a Sizzix machine.  I've played with it here and there, but nothing serious until this past weekend.  I've been seeing a lot of cards with embossed layers and find they are beautiful, fun and unique!  I needed a birthday card for my friend so last Sunday my sole purpose was to use my Sizzix and come up with something pretty!  I think I've succeeded!!  This first card is my friends birthday card.  I used one of my Sizzix folders (didn't write the name on it and threw away the packaging!) and chose a pale blue for embossing.  I added a darker blue background as contrast.  I then pulled some ribbon from my stash.  It has wired edges and is actually a series of variegated purple hues, but I think it went quite well with the blue card stock.  I added a lavender butterfly with some bling in the upper right corner using my SU! Butterflies Embossing Sizzlet. On the bottom right I used my Cricut to cut my sentiment piece and background, then inked, stamped, blinged up and mounted my sentiment.  I added a matching sentiment inside on white card stock. 


Next I played with the Allegro Cuttlebug folder.  I love music, if there isn't a movie I'm watching while crafting, the music is on!  This card stock was a kind of rustic red or country red.  I mounted it on a cream card stock.  I liked the look and decided to make it a little elegant with some gold ribbon along the edge.  I cut a sentiment block with my Cricut out of cream and added a pretty sentiment with a butterfly in the corner from one of my stamp sets with a touch of bling on the butterfly and along the bottom of the sentiment.  I inked up the edges with the Tim Holtz Fired Brick ink pad.  I left the inside blank so the sender can write a personalized note.


This card is a birthday card, with the flowery look to it I'm thinking it's a girl's card.  I used the Happy Birthday Cuttlebug folder with a burgundy colored card stock mounted on white.  I add a sentiment square in white card stock in the lower right corner with a small stamped flower and some matching bling. I then added some flowers in the upper left corner with a heart brad in the middle and a little bling on top.  The inside is stamped with Happy Birthday.

Finally, I did a thank you card using the Thanks Cuttlebug folder and burgundy card stock, again on white.   Using the Tim Holtz small rosette die, I added a mini paper rosette on the front with a gold patterned paper from the DCWV Tradewinds paper stack.  I think it punches up the burgundy a little and gives it some dimension.  Inside I stamped "thanks a million and added a schwoopie in the lower right corner with a little bling.  I stamped it with Tim Holtz Fired Brick ink. 

I think I'll be using my Sizzix a lot more in the future!  Imagine, Create, Enjoy!


Monday, May 30, 2011

Cards – Father’s Day and Birthday

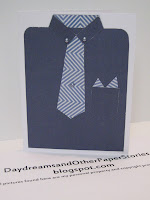
Yesterday I spent some time making more cards…Father’s Day is fast approaching and more guy birthdays!  I always seem to struggle with guy birthdays.  Anyway, today I have CASE’d my good friend Tina’s Father's Day offering.  For Father's Day I did one of each of the shirt and fishing vest offerings.  I changed them up a little by using solid colored paper for the guy’s shirt and a patterned tie and handkerchief for the pocket.  These papers are from the Tradewinds paper pads from DCWV.  For the fisherman’s vest I used Kraft paper and inked up the edges with Vintage Photo ink from Tim Holtz.  I used a circle punch for the sleeve holes and the same for the collar indent on the front of the vest.  I added some twine in the pocket with a swivel attached to the end.  In the other pocket I put a small fish hook attached to some thread hanging off the pocket.  Thanks to my hubby for letting me raid his tackle box!
Father's Day

After finishing these cards I decided to make some for the guy birthday’s coming up.  I created the shirt card once again with papers from the Tradewinds paper pads and added a birthday sentiment inside.  When I was working on the earlier fishing vest it reminded me of a card sentiment stamp I had that goes perfect with the fishing vest idea…so a couple of more vests later I have cards with happy birthday stamped on the outside and on the inside the sentiment  “It’s your day…catch all the fun you can,” great play on words for the fishing concept!  Again, I added swivels and small fish hooks to the pockets to add more authenticity to the cards.  
Shirt Birthday Card

Fishing Vest Birthday Card


As I was finishing these up…I realized you could make the fishing vest for a gal also, I know some gals who also enjoy fishing…hmmm…another project for the next time!

Imagine, Create, Enjoy!