Tuesday, August 16, 2011

Mini Covered Note Books

I have shared here before a smaller covered note book that I made as a gift for a co-worker as part of a matched set.  Well I picked up a stash of these mini notebooks at the dollar store and in my quest to use up my abundance of paper scraps, I spent some time on these little books this weekend.  These all have themed Christmas papers, leftover scraps from the larger organizer's I made last year before Christmas.  I thought these would be great little gifts.  They are the perfect size to fit in a purse or a pocket and the perfect size to jot notes or make grocery or shopping lists or keep your different lists of your craft supplies in.  I attached the patterned paper to the front and back of the books and added a small tag to the front of each book and labeled it notes.  I secured them to each booklet with a coordinating thin ribbon from my ribbon stash.  I've also added a little bling to each one as well.  I think I'll donate these to my friend at church for her fundraiser for stroke awareness.

Imagine, Create, Enjoy!

Sunday, August 14, 2011

Scrap Cards

Since moving again this last June, I have struggled to find time to craft.  Partially due to our son having moved in with us, we have down sized once again, and the main factor: I'm still getting unpacked.  We've unpacked the majority of our stuff...but since downsizing we have a smaller space, about 300 ft. smaller and my son is now living in what is supposed to be my craft room.  This weekend though, I pushed him out of his room and out of the house, set up my craft table, and set to work.

I've been trying to use up scraps and had started a couple of different cards.  This set are general notecards in a Disney themed set.  I used the paper scraps from the patterned Disney papers and matched them up with red, black, and yellow.  I used a side open orientation and a standing orientation on the cards.  I also used a decorative border punch to add a little variety to one of the cards.  I have a Mickey head punch and used that to spruce up the cards and as my signature spot on the back of the cards.  I added white cardstock inside and left them all blank inside so the recipient can use and personalize them as they see fit.

I then made a card holder with bright yellow paper and one of the other Disney patterns mounted on the top.  I added bling on the corner which is a little jeweled Mickey head in red and used some Mickey grommets for the edges of the folder to add ties for the folder.  The folder holds five note cards and five envelopes.  I chose not to label the outside which will allow the recipient to reuse it for anything they want.

Imagine, Create, Enjoy!

Monday, August 1, 2011

Winner, Winner, Chicken Dinner!

Well, not exactly a chicken dinner, but I did win some free stuff!!! Love free stuff!  Over on the Everyday Cricut blog site they celebrated their two-year blogaversary last week with product giveaways every day!  All you had to do to participate in the drawings was to post a comment each day; easy enough...but you know, you look at those contests and the number of entries they receive and you figure you probably won't win anything!  At least that's what I figure, you know, like winning the lottery, the more people who enter, the lower your chances of winning.   So, when I opened my email this morning and was reading through today's blog entry, I was pleasantly surprised to learn that I had won the drawing for Day 2 last week.  My prize, five, count them five new stamp sets from Creative Time! I can't wait to get my new stamps and use them.  They have such cute stamps, a little retro, but so applicable and up to date!  Thank's to Melanie and Joy and Everyday Cricut!  Love your stuff! 

Thursday, July 21, 2011

Father’s Day Gift

I know, I know…Father’s Day was last month; however, we celebrated a little late this year so we could gift this particular item to my husband Rich while all the kids were here in town this past weekend.


Back in May my co-worker Jayne gifted me for my birthday this lovely bargain bag package we had seen at one of the local stamp stores.  They were having a sidewalk sale and we had gone over to check it out one Saturday morning.  I must admit here that I passed over this particular item because of the way it was packaged.  I also didn’t see the Dad board book in the packages I looked at.  The papers are all by BoBunny from their Cambridge Collection.  There were also some dimensional as well as conventional stickers in the same line.  The line reminds me of King Arthur and the knights.  While looking at the paper my mind immediately went to children dressing up as knights, etc., so I passed up picking the package up.  I wasn’t thinking outside the box on this particular day!  Well, when at work the next week I saw the packet Jayne had picked up and the Dad board book in it, I was bummed I had not spent more time searching through the packets at the store.  I could immediately see that I wanted to make a gift for my hubby that would be from the kids for Father’s Day.  Jayne had bought extra kits for her stash and graciously gifted me one for my birthday.  I was off and running.
 
With four children I wanted to make a book that would reflect the kids and their relationships with their Dad.  I added a page or two in plain double-sided card stock in between the cardboard letters and came up with enough pages for each kid to have a page of their own.  I also went back in my picture stash and pulled pictures of each kid as an infant or toddler.  I then paired those pictures with a current picture of each child.  Additionally, I added some group pics throughout the years as well as some individual shots of each kid with their Dad.

Finally, I asked each of the kids to come up with 2 or 3 things they loved about their Dad.  I then took 3 of each of their statements, printed them on a linen colored paper and inked up the edges to give it an antiqued look.  Those statements filled one of the pages. 

He couldn’t finish reading it when we gave it to him…I think I saw a tear glinting in his eye!  I think it was a hit.

Until next time!
Imagine, Create, Enjoy!

Tuesday, June 14, 2011

Motorcycle Bag

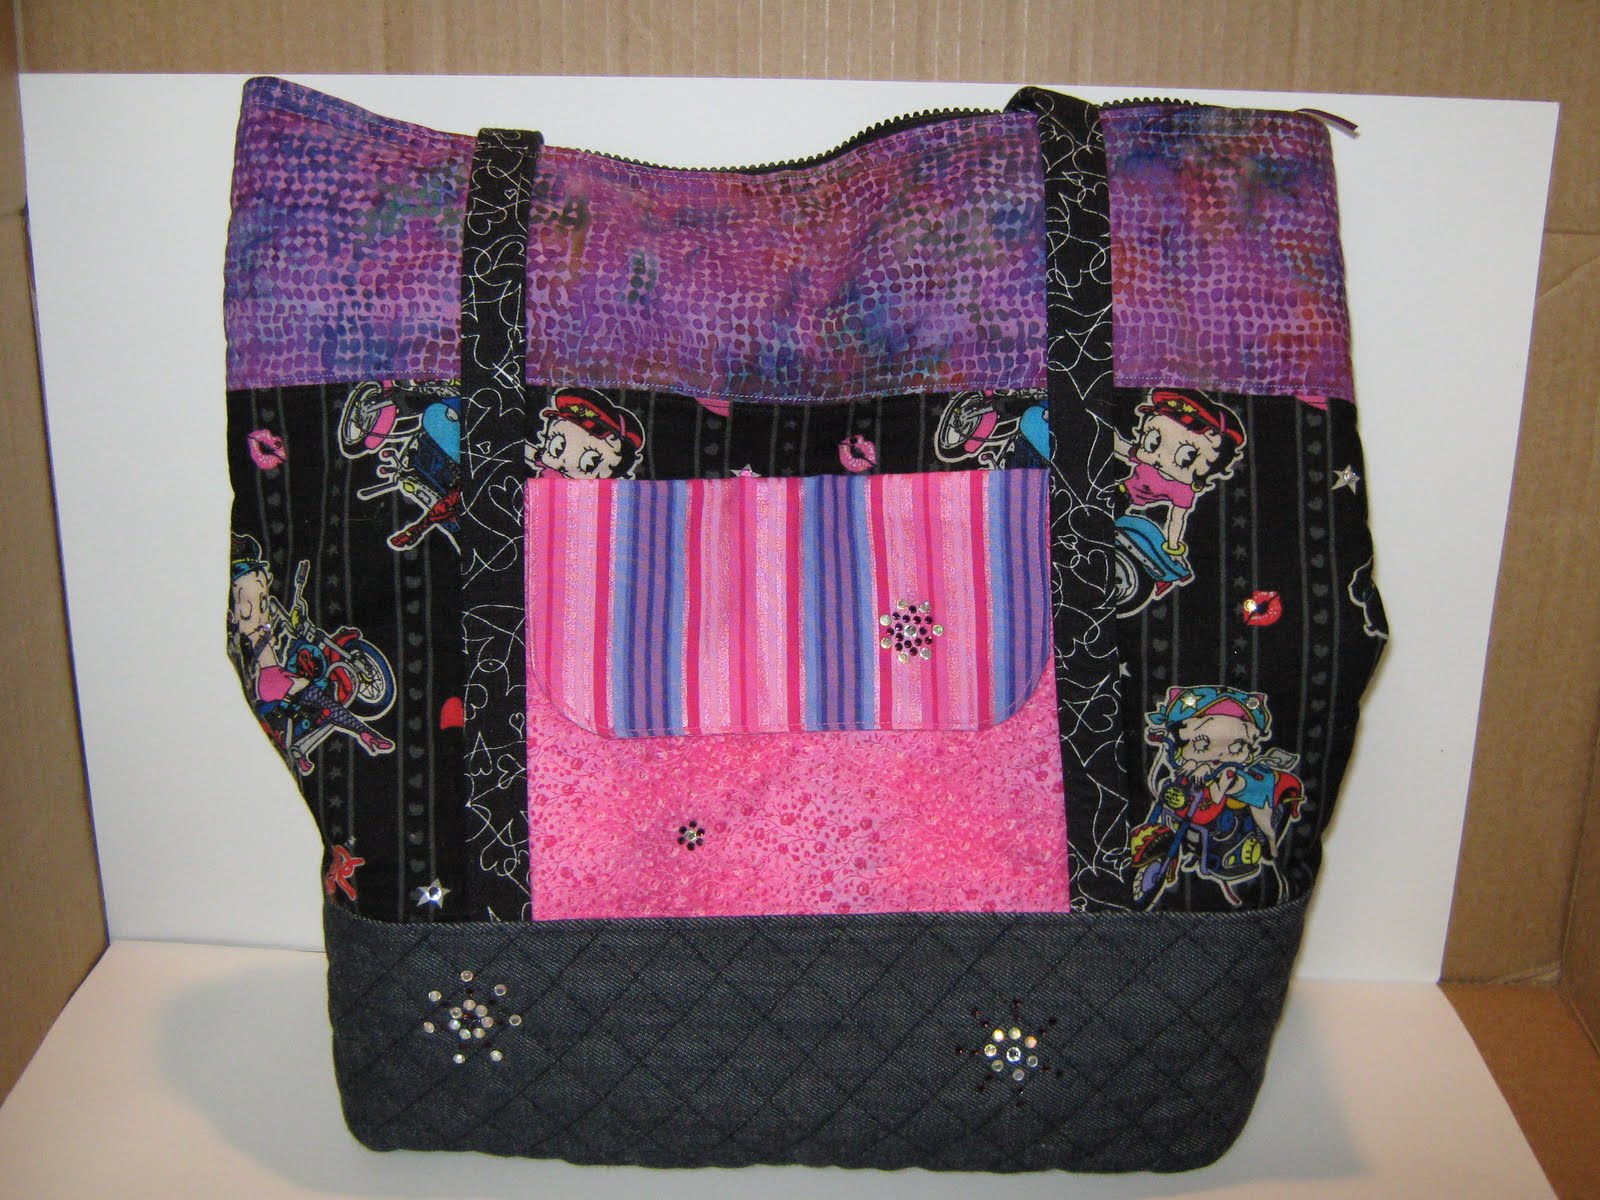
Recently my neice gifted me with a book bag she had made with fabric scraps she inherited when my Mom, her Grandma passed away.  I was so impressed with the bag I asked her to make one for my co-worker Jayne for her birthday.  Jayne and her hubby Jim ride motorcycles, Harley Davidson motorcycles to be exact, so do my neice Teri and her husband Dan.  I knew she would be able to make what I was looking for because she had the practical experience and knowledge of Harley Davidson's and would be able to get the dimensions for the bag down.  Jayne loves bling.  She is the Queen of Bling (love ya, Jayne!) and she is the first to admit it. I wanted something that Jayne could put in the buckets on the bike, so it had to be functional as well as cute.  I think Teri exactly captured what I wanted in this bag.

It has a quilted solid bottom in a grey-black color and patterned sides with pink pockets on the outside.  The patterned fabric is Betty Boop on her motorcycle.  She coordinated the colors on the outside and added bling to the pockets and the outsides of the bag.  This pocket is a double pocket, one next to the outside of the bag and under the striped flap is another pocket.  Teri also added a coordinating purple pink fabric around the top of the bag. It has a zippered top and shoulder handles.  The shoulder handles go down the sides of the bag next to the pockets on each side.
Inside fabric
Inside pockets


The inside of the bag is a different patterned fabric, again Betty Boop on her motorcyle but it is in black and white with pink outlined hearts.  Teri used the striped fabric used on the outside pocket to make a series of pockets around the inside bottom of the bag.  All in all I think it turned out fabulous and Jayne seems to like it which is the important part.    

Thanks for stopping by today.  Imagine, Create, Enjoy!


Saturday, June 11, 2011

Graduation Cards – Part 2

So after I completed the previous post I whipped up this little graduation cap in my neice Natalie's school colors.  Here is the one I did for her. 


This is what it looks like when closed, I used embroidery thread for the tassel and attached it with a black brad.  I had these graduation stickers so I cut down the strip with the caps and diplomas to fit on the bottom which you can see when you first take the card out of the envelope.  Once you open up the hat you see the following:

I folded it back so you could see the full length of the card.  On the inside of cap I stamped You Rock! and Celebrate.  On the bottom half of the card I added Graduate and Congratulations.  The stickers on the bottom half of the card have pop dots behind them to add dimension.  These graduation caps were actually very easy and quick to do up.

When I started making graduation cards this weekend I had the cap idea in my head for the cards, and found the great idea/tutorial noted in my previous post.  I had also been kicking around how I could make a card that was shaped like a graduation gown.  I had some Jolee’s Stickers graduation embellishments that I could have just thrown together with plain card stock and would have produced a nice little card, but I wanted something more.  I mulled it around for a while and kept looking at the embellishments and decided to do some free-hand drawing.  Now mind you, I have never considered myself to be an artist.  In fact that would be the least likely word I would use to describe myself, but artistic I became.  I freehand drew the likeness of the graduation gown from the Jolee’s package onto card stock.  

 I used that as my pattern and traced it on to the light blue cardstock.  Since my niece will graduate from UCLA I wanted to use their school colors and I also wanted the gown to have that sheen associated with finer materials.  I chose a solid matte finish Bazzil light blue card stock and cut the card out, but I wanted to add dimension to the front of the card so it would look like the folds on an actual gown.  I traced the front of the gown onto copy paper, cut it out, and traced it onto Bazzil’s line of shiny papers.  After cutting it out I proceeded to cut it apart, into the individual pieces for the front of the gown.  I also wanted to add in the UCLA yellow on the gown somewhere, so I cut a V shaped insert to go around the neckline and then layered the shiny blue bodice part over it.  To achieve the dimension for the flow of the gown on the front I set the outside folds directly onto the solid blue card stock and then the next two folds on each side I used pop dots to bring them up off the card stock background.  For the middle fold I used fatter pop dots to make it stand up just a bit higher than the sides. 

When you open up the gown I have mirrored the yellow from the collar for the inside of the card. 

Then to add a nice finish I used my Cricut machine to cut the UCLA letters in yellow and ran through my Xyron to apply adhesive and put on the bottom of the front of the gown.  I think my niece will enjoy it! 


Thanks for coming by…hope to see you again soon!  If you’d like to let me know what you think of my creation, feel free to leave a comment!  Imagine, Create, Enjoy!

Monday, June 6, 2011

Graduation Cards – Part 1

Lots of graduations this year for us!  Two in our family alone!  I was looking for a sample of a graduation cap card and found a few great tutorials on You Tube.  The one that I really liked was this one by Dawn Olchefske who is a Stampin Up! demonstrator.  I changed up her design by using the school colors for each of the graduates.  First I did one in a royal blue and orange, the colors for Consumnes Oaks High School here in Elk Grove.  After cutting the backing cardstock in the blue and marking the fold lines I added orange inserts to the graduation cap lid and the bottom of the card.  I added some orange cording with a black brad to anchor the tassel to the top of the hat and on the orange paper inside the cap I stamped Celebrate and You Rock!  I added some deep blue bling to match the cap color.  I chose to add Jolee’s Boutique graduation stickers to this one.  I cut them apart and modified them slightly so they would fit (mostly) under the fold down section of the cap.  I think this one turned out pretty cute!
Card Closed

Card Open


The next two cards I did are for my nieces.  Both are in the same family and both graduate on the same day, one in Northern CA and one in Southern CA!  Rob and Lisa will have fun getting to both of those functions!  Anyway, because the girls haven’t yet opened the cards, you will have to tune back in to see what their cards look like.  Each one is different.  I can’t share them yet as I know at least one of the girls checks out this blog and I don’t want to ruin the surprise!

Come back by soon!  In the meantime, Imagine, Create, Enjoy!