Showing posts with label Bling. Show all posts

Wednesday, March 11, 2015

Christmas Cards

There are many, many pins on Pinterest on how to use paper scraps, so this could be a compilation of different posts I've seen.  I chose to make my Christmas cards this last year using scraps. I used Christmas papers, plain white and a soft beige pre-made cards picked up at Michael's packaged with envelopes.  I chose to punch 1 inch squares two in patterned paper and two in a coordinating solid card stock and then arranged them in groupings of four both diagonally and horizontally on the card stock.  I punched snowflakes (using a Martha Stewart snowflake punch) out of a sparkly white paper to act as accents.  I assembled the grouping of four using pop dots to pop the squares off the card stock and also popped the snowflakes off of the grouping and added a jewel to the center of the snowflake.

After the squares and snowflakes were placed on the card stock I stamped two different holiday sentiments underneath the above arrangement and then added a different stamped sentiment on the inside of the cards.  Finally, I used a variety of narrow ribbon I had in my stash in colors that matched the scrapbook papers and tied it around the fold line of the cards.  This was a quick and easy little project and I was pleased with the end result.

Imagine, Create, and Enjoy. 

Tuesday, August 12, 2014

Note Board

One of my grandsons wanted to make a present for his mom's birthday.  I looked through my supplies and found an unpainted narrow wood frame, a few jewels, a flower, some heart stickers and some cork board.  Those supplies to start, along with a trip to Michael's for ribbon and silver jewels.  I used an idea from Pinterest which I no longer have a link to; and, I have modified the project slightly from its original design and came up with this idea. 

Nikeo painted the frame a nice black matte color and while he was doing that Grandma cut the cork board to fit the frame.  I double layered the cork board to make a thick base to stick pins and tacks through.  After the painting was done I took the roll of sparkles/jewels and cut the strips down to effectively fit around the edges of the frame and still allow enough room for items to be pinned to the board.  The row of jewels you see in the middle of the cork board hides a seam where I had to piece the cork board together.  Once that was hot-glued down, I took the ribbon and hot glued it to the edge of the frame.  The ribbon design is hard to see but it is a zebra stripe with silver and red, not pink as the pictures tend to show.

The ribbon was accented perfectly with the zebra print daisy that we affixed to the lower right corner with a little heart sticker on in the middle. After that I found some swooshies in black jewels and I added them to the board.  One looks like it is flowing out of the daisy on the bottom right half of the board and the other accents the lower left corner of the top of the board above the row of jewels.  A couple of more little red hearts to match the ribbon and the board itself was finished out. 

On the top I used more of the ribbon from the edges and made a hanger which I attached to the back of the board.  All in all it turned out really cute!  Nikeo's mom liked it and it holds a prime place on the wall in her bedroom!

Until next time, Imagine, Create, Enjoy!


Friday, April 4, 2014

Chalkboard Hearts

It's A Girl! We were very excited when we found out that we were having a new granddaughter!  We found out back before Christmas and have been eagerly anticipating the coming of little Laila Olivia.

When we knew we were having a baby shower here, I went looking for some unconventional ways to display the news in the decorations. Everyone of course knew it was a girl, and I wanted a unique way to display that.  While in Michael's I found these cute little chalkboard hearts.

The hearts were plain chalkboard hearts with no embellishment.  I painted the dowels with the white frosty paint used on the butterfly wands.
I decided to use some pink glittery letters I had in my stash to spell out the sentiment.  I then added some hot pink glitter all around the edges of the heart and let them dry.  Finally I sealed them with a high gloss sealer and then to finish them up I decided to wrap the sticks attached to the hearts with some pretty pink flowery ribbon from my stash.  I glued it all the way down the sticks wrapping with a nice even spacing.

I wasn't exactly sure how I was going to use them at the shower but when we decided to put the diaper cake on the gift table, it was natural to just pop them into the top of the diaper cake!  See you soon!  Imagine, Create, Enjoy!


Wednesday, March 26, 2014

Hanging Mirror Baubles

I don't recall exactly where I saw or heard of this idea and I certainly can't find a pin on my Pinterest boards that is representative of it but likely I've seen it somewhere online.  I thought it was a cute idea so decided to make some for Christmas gifts. I bought small  mirror pieces that you can find at any craft store.  I chose small rounds, probably an inch in diameter.  I cut approximately 6 inch lengths of thin craft ribbon in holiday colors doubling them over to make a loop and hot glued them between two of the mirror rounds.

The idea for these little baubles is that you hang them between the branches of the Christmas tree and they reflect the sparkle of the Christmas lights and add more twinkle to your holiday decor. I packaged them in groups of six and they were a lovely little stocking stuffer and a little something to give to those individuals whom you want to remember in some small way at the holidays.


They were a quick, easy gift and one I would do again!  Great for your child's teacher, the mail deliverer, the paper boy or girl, babysitter, whomever.


 Keep on crafting!  Until next, Imagine, Create, Enjoy!

Shadow Jingle Boxes

I found the post for these Jingle boxes on Pinterest and when I clicked through it came from here.  I wanted to replicate the idea for Christmas gifts for family and friends.  I pretty much followed the picture as it appeared in the original post.  I made almost a dozen for various friends and family members.  They are a cute addition to Christmas decorations and can be specialized in color, background and the colors of the bells to coordinate with any decor.  When the original one was done the crafter utilized a smaller frame from IKEA.  Truth be told, I didn't really look at her directions until I started writing this.  I just took the picture and ran with it but on a larger scale. My frames were the 8x8 frames you can pick up at craft stores.  I picked these up at Joann's with a 70% off sale.  Around $4 to $5 I believe.  The original design just used a patterned piece of scrapbook paper and a pre-cut sentiment from Stampin Up!  I utilized my Cricut and ran the letters through my mini Xyron to apply adhesive to the back. I started with the same sentiment but after a couple decided I needed to change things up.  I used patterned paper with Christmas trees in the background and added snowflakes next to the words on this first one.  I also wanted to utilize the various colors of jingle bells available during the holidays, so opted for red and silver in the first box and some green gold and red in the second box.


Because the frames came in white, I left them that color.  My biggest challenge was finding ribbon the right width to go around the frame.  Well, there wasn't any.  I believe the frame is 1 1/4 inch wide, all of the ribbon I could find during the holidays was 1 1/2 inch wide, so I went with it.  It means there is a little bit of over hang around the edges but it looks good.  I also chose wire-edged ribbon as I wanted the bows to stand up and be able to be shaped and formed.

Once I got the first couple of boxes done I decided to go with some different sentiments, thus the boxes that follow.  I had some paper with sleighs on it so highlighted that image in the lower corner and tucked in some red, white and silver bells along with glittery red letters.


For this one the background paper is of candy canes and gingerbread men, sugarplums and all the associated words and images that go with that thought...thus the Visions of Sugarplums title for this box.  Once they were completed, I added a light spray of glitter to them to punch them up just a bit.  These pictures don't do them justice and it is difficult to see the bling...but it is there.


There are still a couple sitting in my closet to be delivered to some friends.  I hope they like them.

Until the next time, Imagine, Create, Enjoy!


Thursday, July 4, 2013

Another Card File

Previously I had made a Dates to Remember card file here.  The idea was originally featured over at Scrappin Cats blog.  I decided my girlfriend also needed one of these handy files for the other part of her birthday gift.  It was fun creating it...I used a K&Company Susan Winget Meadow paper pack.  It is a beautiful garden variety pack of papers I picked up at Michael's on clearance and it has made some wonderful cards and other projects.  I had saved the template I'd previously made for the individual months of dates and once all of the envelopes were covered with the Meadow paper I printed the date lists, inked around the edges and fixed those on each page.  I printed the months of the year on white card stock, used a punch to punch them out and after inking them, affixed them to the flap of each envelope.  I added a little bit of bling, both jewels and pearls under each of the month names.

For the back of the card file I used two cereal boxes cut to 6 x 9" the same size as the envelopes and covered it with white card stock and then matched the rest of the paper in the pack.  I put a two hole punch in the top and put two rings into the card file.  I covered the rings with a variety of yellow and green ribbons from my stash.

For the front of the file I printed the word Celebrations on card stock and then used a star punch to punch the edges of the paper.  I centered the piece in the middle of the front cover.


To complete her gift I added a small supply of hand made cards I had in my stash.

Until next time, Imagine, Create, Enjoy!

Tin box makeover

I had picked up these lovely little metal tins for a great price while shopping for another craft project.  I thought they would make a great gift project.  Another friend's birthday last month.  She loves when she receives my craft gifts...she's a big fan of my homemade goodies and I enjoy her delight when she opens them.  The tin's measurements are 5 1/2" by 3 1/2" wide and 1 5/8" deep.  I had used some papers from DCW's Tradewinds paper pack.  The piece I chose for the top of the box had two of these beautiful butterflies one at the top of the page and one of the bottom.  I'll get two different boxes out of that particular page.  I cut the strip to fit the top and rounded the corners.  I attached it to the top of the box with a tape runner after inking the edges with some Tim Holtz distress ink.  I cut the paper to showcase the butterfly which left some space on the lower right corner of the lid.  I wanted to personalize the box for my friend so I pulled my chipboard letters out, found a "J" and painted it with some copper paint I had.  After it dried I added some pretty pearls to the ends of the swirls of the letter.   I took some copper and gold threaded ribbon from my supply and glued that around the edge of the lid.  I also glued it around the inside rim of the box.  That was an accident, as I realized afterwards that it would make closing the box a challenge.  I would not do that the next time.  Around the outside of the tin I cut two strips to band the box; because there were two seams on each long side of the box I cut two small pieces of the ribbon I used around the lid edge to cover the seams on the band.  My adhesive of choice was E6000 to make sure everything stuck properly.  I also cut a piece that matched the lid piece and used it to line the bottom of the inside of the tin.


Once the box was all finished I started making matching note cards for the tin. I cut strips of natural card stock for the back of the card and pulled some of the other patterned paper from the Tradewinds paper pack.  I used the corner rounder to round the corners of the card and then cut a small square of the natural card stock.  I stamped the word "thanks" from a StampinUp! stamp set on the square and mounted it with foam tape to give it some dimension.  All together I made eight little cards to fit in the tin.
I decided the set needed some matching envelopes.  Since these were not standard sized cards I made some envelopes out of the same card stock I used for the cards.  When they were finished I stamped my girlfriend's initials on the back flap of the envelope to add a little flair.

Here is the completed set.  They turned out quite nicely.  Since I bought a few of the tins ($1.75 each online) I will be able to make a few more gift sets.  These would be cute with a Christmas themed paper, maybe little Christmas thank you notes!


 Off to do some more crafting!  Go ahead, Imagine, Create, Enjoy!


Thursday, May 9, 2013

Mother's Day

Capitalizing on the punch idea for Mother's Day, I had found another Pinterest idea here.  I used some more of my Asian inspired paper but I made both the top and the bottom of the dress out of the same paper.  I still used the tab punch for the top, but I took my scallop punch and punched across the top edge to give a scalloped edge to the top of the dress. For the skirt I took off the sides of the scallop and used those as layers so it gives the appearance of ruffles.  I tied up the waist of the dress with a gold edged ribbon and added some red bling along the top of the dress.  I used the SU! butterfly sizzlet and punched it out of the same paper and added bling along the spine of the butterfly.  I cut the strip for the sentiment and stamped it.  I then added a small flower in the corner with some more bling!  Finally to finish it off, I mounted it all on a reddish card stock on top of tan for the base of the card.  I added the same ribbon I used for the dress sash for the edge of the card and tied a little metal butterfly I had in my stash to finish it off!

That's it for this one.  Take care and Imagine, Create, and Enjoy!


Wednesday, May 30, 2012

Threaded Card Toppers

Over the weekend I worked on some threaded card toppers.  Many, many thanks to my friend Cathy over at Scrappin Cat's Creative Endeavors for the Cricut cut file which she created and showcased here. Her blog title indicates a Pazzles file, but bless her heart she also made a Cricut cut file which she graciously shared.  I am always looking for ways to use up my paper scraps...my mother was raised during the Great Depression where you used and reused everything, what can I say, waste not, want not.


These are my first two attempts which I did horizontally.  The patterned paper is from K&Company, one I have shown before on my blog, I added some bling on the front and the papers have some glitter already so I think they turned out nicely.  I left the insides blank for the recipient to write her own notes.


The next one was done vertically.  I added a butterfly to the one on the right and added a swooshie with some dots as accents.  On three of the four cards I did a layered sentiment tag and then mounted that on pop dots.  I added some bling to the bottom of two of them.  I used cream card stock for the backs and used one of the patterned sheets in the paper pad for the background paper.

And finally, I decided to do a couple of these with ribbon.  I had some ribbon I'd picked up in a grab bag over at Stamper's Corner and decided to use it.  I chose white card stock for these and once threaded with the ribbon I mounted it on a lavender card stock and then mounted all of that on a white A2 size card.  I chose the lavender background paper scraps to cut a small sentiment block and made a thank you card.  After stamping the sentiment I inked the edges and mounted it on pop dots before affixing it to the front of the card.  I added a couple of the butterflies from the sizzlet to the top of the front of the card, added a quick sentiment on the inside and called it done. 

The next one used the same ribbons only in reverse order with the darker purple ribbons on the outside and the green one in the middle.  For this one I picked a darker purple to mount the threaded layer on and for the larger tag and mounted a lighter green (to match the ribbon on the front) on top and stamped my image and added some darker green bling above and below the sentiment.  I used my Spellbinders die for these tags.  Again I raised this one with pop dots to give it some dimension.  I left the inside blank.  

These were fun, easy and best of all used up scraps!  See you next time!  Imagine, Create, Enjoy.


Friday, May 18, 2012

Bridal Shower Card

Spring, early summer...the time for Mother's Day, Father's Day, weddings, graduations, babies....it seems like we are experiencing all of them this year.  Last weekend went to my first bridal shower this year.  I wanted to do something special for the card and use my Cricut machine.  I have the Tie the Knot cartridge so figured I could come up with a pretty cute shower card.  Opened up my Cricut Create software and got to work.  The bride to be was registered at two places...Target and Fredrick's of Hollywood!  New, first time bride so this was going to be fun!!!

I decided to go with the lingerie theme for the card and chose the corset for my card.  I chose the outline image and copied it and then flipped it and melded the two pieces together.  That was my card base.  Then I did the layers.  The card is cut to about 5" high.  If you want exact measurements, send me an email!  I had found a You Tube video using this image so I just modified it for the layers and created all of it in a cut file.  The bride's colors are purple and green.  I chose a deep purple for the card base and then a sparkly blue for one layer and finally a piece of scrap from what's left of my Susan Winget Botanical paper pad and cut the overlay.  It is a combination of purples, greens and other floral colors.  I had to play with the corset top layer some to get the exact image size down, but the finished product was definitely worth it. 

After assembling all the pieces together, I added three pearls to the button holes on the front and then added some bling along the top edge of each leg.  The shimmery layer of light blue paper and the little bit of bling made it pop nicely. 


For the inside of the card I used the exact same layer but cut it out of a lighter lavender card stock and layered it on top so I could stamp the sentiment.  I inked up the edges with some purple ink and added the sentiment.  The sentiment says: True love stories never have endings.  Great sentiment for a new bride.  I also added a little stamped duo of hearts on the top right and a little bling on the curly Q at the bottom. 

Turned out quite nicely and the bride was tickled with it too!  That's probably the greatest feeling as a crafter is to have one's work appreciated by the recipient! 

I decided to make a gift tag to match the card.  The Tie the Knot cartridge is set up with a whole tab devoted to tags and they mirror the larger projects.  I could have done a corset tag but decided on the lips cutout.  I cut the tag in the dark purple to match the card base and then layered different colors of purple and even chose a sparkly paper to make the lips look glossy!  This cartridge also has a lovely swirly letter alphabet, so I cut a "T" the bride's new last name and placed it on the bottom of the tag.  I inked up the edges with purple ink and put a grommet in the whole and laced it up with some glittery ribbon.  Sorry the pic is a little blurry.

Thanks for stopping by today...hope you enjoyed today's offering.  I love hearing your comments, so please leave one.  Until next time, Imagine, Create, Enjoy.

Saturday, February 18, 2012

Birthday Card

My future daughter-in-law's birthday is coming up so I wanted to make a special birthday card.  I utilized the idea found here. I utilized some of my papers from My Minds Eye paper pad I picked up a couple of years ago.  I added some brown satin ribbon along the left side and then utilized my Tim Holtz Tattered Florals die to add the flower.  Rather than use different colored papers on alternating flower pieces I used all golden card stock.  In the middle I added a green brad and a green jewel on the top of the brad.  Since the color theme seemed to be gold, green, brown tones, I added the sentiment Celebrate on the bottom in Vintage Photo distress ink also by Tim Holtz.  Inside I stamped a Happy Birthday sentiment.

Simple, but cute and I like the flower...I think it gives it a nice focal point. Hope Dana likes it too!

Until next time, Imagine, Create, Enjoy!

Monday, January 16, 2012

Birthday Gift Card Holders

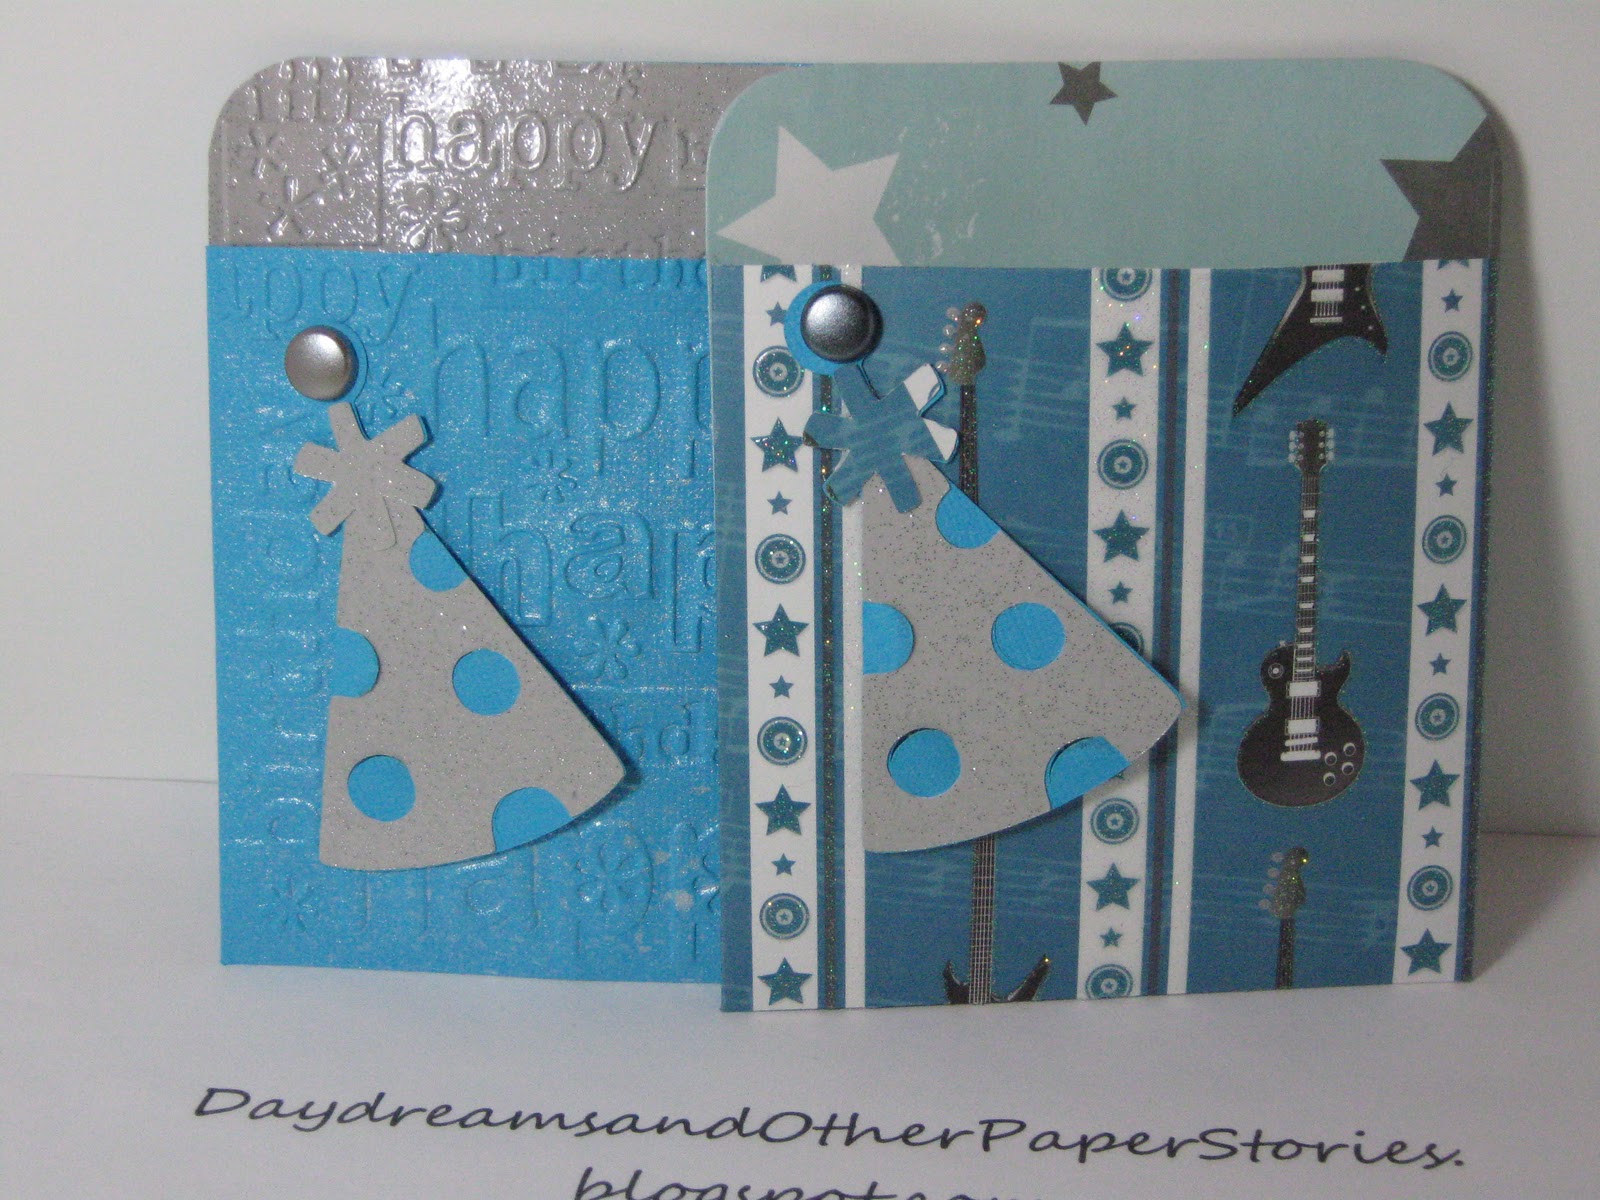
Well the holiday's are over and the new year begun and now starts the rounds of birthday cards, and I'm just talking about my family!  This month we start out with a niece and a nephew just a week apart.  During the Thanksgiving weekend sale I picked up a new pocket die from Sizzix on a deal I just couldn't pass up, about 70% off.  I loved the original selling point of the die which was for Christmas gift cards.  Unfortunately, I didn't get around to making any of those for the holidays.  It is an extended die which required an extended crease pad which I could not find anywhere in town so had to send away for it.  Since I didn't get that ordered until after Christmas, I decided to use the die for my upcoming birthday gifts.  The first ones are for guys, I had some rock star paper and some paper with guitars on it by Best Creation, Inc., what a perfect paper background for a guy gift card.  The paper with the guitars I used for the one of the holders didn't require much additional embellishment as it was glittered up, so I just added a party hat from my Doodlecharms Cricut cartridge in complimentary colors.  Since the embellishment was really a tag, I added a sparkly silver brad on one and a charcoal black on the other one.  The only thing to remember when working with paper with lines and a definite pattern direction is to make sure your paper is going in the correct direction when using the die!  I also decided to make a envelope to go with the guitar gift card holder.  It is not one you would be putting in the mail, rather hand delivering it to the recipient.  I used my Plaintain Schoolbook Cricut cartridge and cut the envelope from the rock star paper.  I attached a small tag in the upper left corner to write the recipients name.


I then made a couple more in just solid colored blue and neon green paper.  I used the Happy Birthday embossing folder by Cuttlebug and added the party hat embellishment cut on my Cricut.  On the blue card I spritzed some silver Perfect Pearls to make the paper shiny and to match the silver glitter paper on the back part of the card holder.  I left the green one kinda plain, still embossed and spritzed the hat overlay to give it just a little pop.  I didn't want to go to overboard on the glitzy on these solid colored ones figuring they could be for either a guy or a gal.  If I do use one for a gal, I'll just add a little bling to jazz it up.


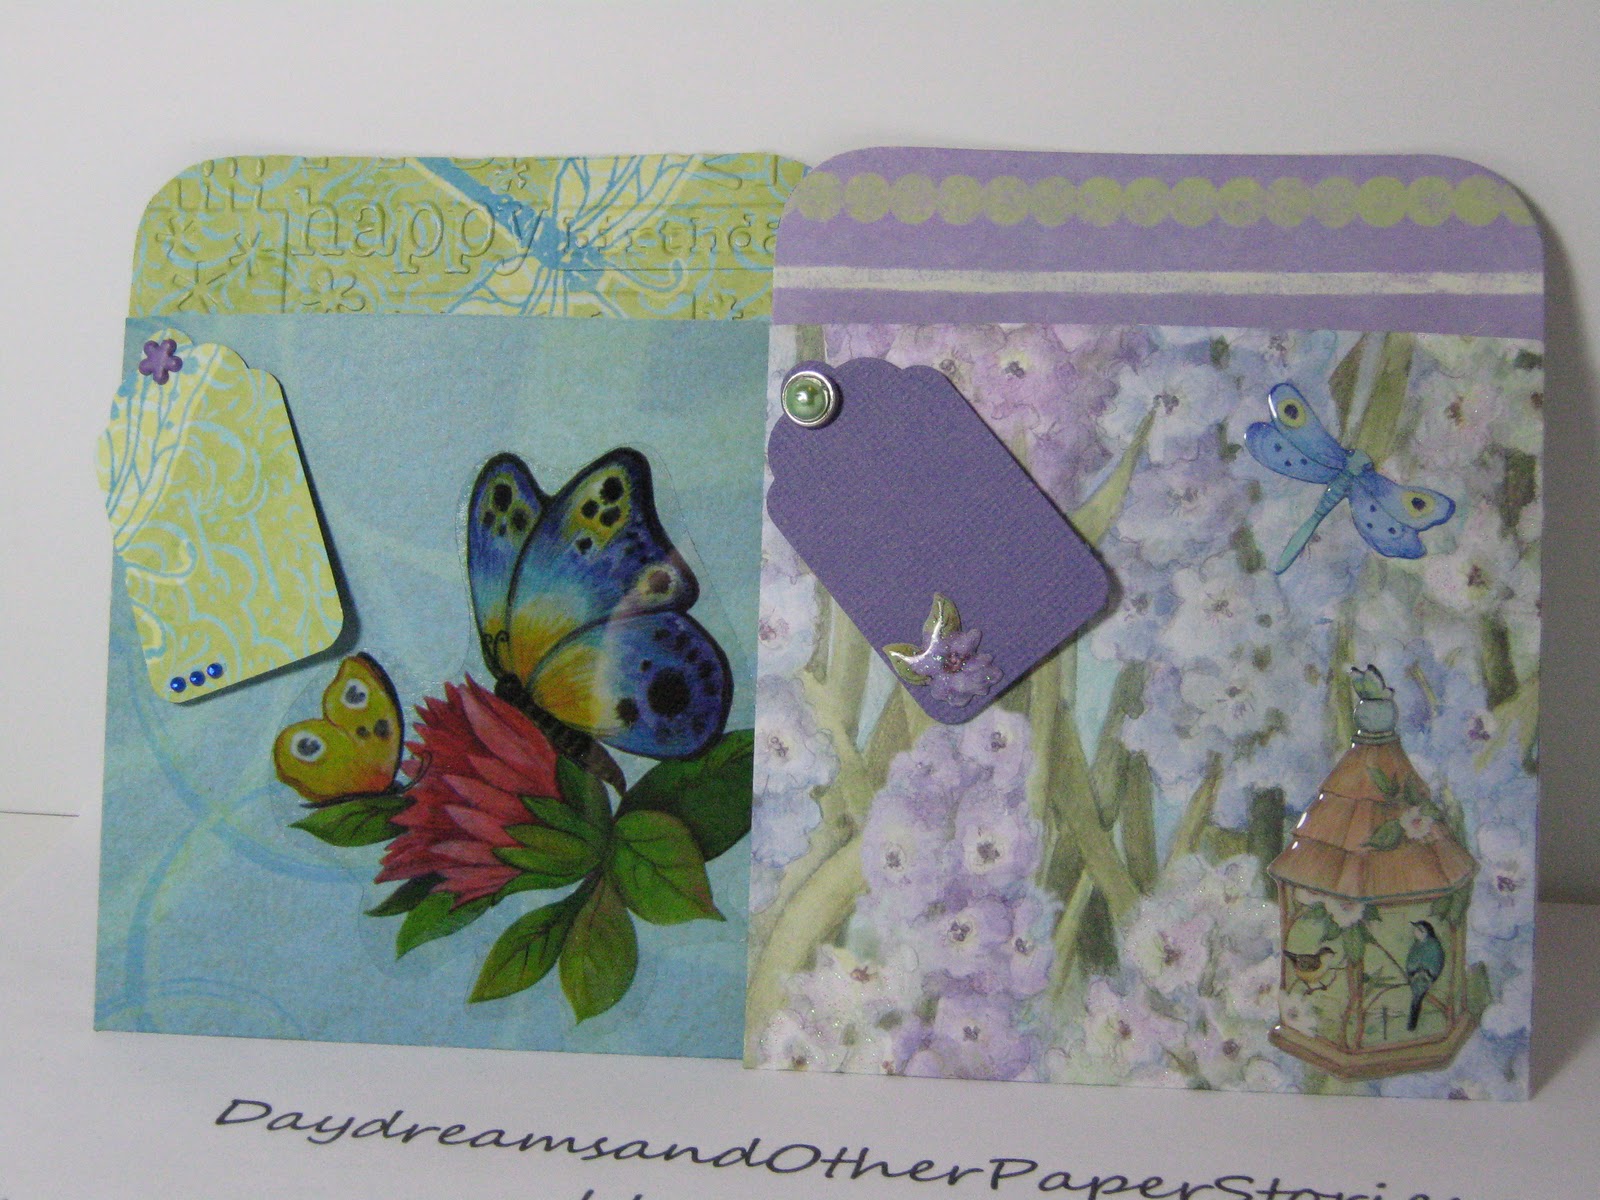
For the girls gift card holders I went with some floral papers I had from K&Company, the Susan Winget collection.  I've gotten such a great amount of projects from these paper pads it's just amazing.  For the green one with dragonfly's I added some paper embellishments after embossing the folder with the Happy Birthday folder.  Ont the blue folder I used an embellishment and added a small tag with a little bling.  For the last one I used some of lilies paper from the same pad, added some of the coordinating puffy embellishments and a small lavender tag with a green pearl brad for the recipient's name.


I can see gift cards holders for all sorts of holidays and occasions in my future!  Imagine, Create, and Enjoy!


Sunday, January 8, 2012

Monogrammed Note Cards

I had previously seen these beautiful monogrammed card sets here and knew I wanted to make some for gifts.  So I made a set for my hairdresser as a Christmas gift and then made two other sets as gifts.  I chose white card stock for the card and embossed piece and used a deep purple card stock for the contrast color.  I used the Musical Flourishes Sizzix embossing folder to add some texture to the front of the cards for the lady's version, an embossing folder that has plenty of schwoopies, and added the monogram for each lady.  I popped up the monogrammed circle off of the card to give it some dimension.  A little bit of bling and they were simple but very pretty gifts.  The first set I made for my hairdresser Kelli I made all the same orientation and they opened from the bottom.  I also embossed the flap of the envelopes as well. 


The second set of lady cards I did half with a top to bottom orientation and the other half opened from right to left.  That changed it up just a little bit.  I chose white card stock again but went with a more lavender toned paper for my contrasts.  The monogram was popped up off the card and blinged out and I also embossed the flap of the envelopes on this set as well.


The third set of cards was for a man so it needed to be more masculine.  I used a Sizzix embossing folder with diagonal lines for the texture and instead of white card stock I used cream and burgundy.  For the monogrammed pieces I used my Cricut and cut a kind of retro sign looking piece in two different sizes.  For these I used the person's first and last initials of their name rather than just their first, and because they were for a guy, I used a font that was a little less swirly and feminine looking.  Again, I did two sets, one that opened top to bottom as shown on the left and then one set that opens right to left.  I think they turned out nicely and were well received when gifted.


I will be making some more monogrammed notecards for gifts for sure.  Until next time, imagine, create, enjoy!

Tuesday, December 27, 2011

A Different Paperbag Book

I was surfing and saw this video at the Following the Paper Trail blog.  Laura does a wonderful tutorial on a different type of paper bag book.  I was surfing because I was looking for some gift ideas for Christmas and her how to video gave me the idea for the mini book I made for the best friend.  Becky and I have been best friends since high school.  When the idea came to me I wanted to be able to document our lives at different points over the last 35 years.  They would be events of significance and obviously ones of both of us for which I had pictures that I could use for the book.  This is the front of the book.  Becky loves sunflowers so I chose papers from a pad of K&Company papers I had.  Susan Winget is the designer and the paper pack was Spring Blossom.   One of the pages had a bike on it with a basket of flowers where the predominant flowers were sunflowers, just what Becky likes.  By the time I cut down the paper you mostly can just see the basket in the lower left corner and the flowers that cover the front and spine.  I used a matching green leaf patterned paper for the back that coordinated with the background behind the flowers.  I used some Tim Holtz distressed inks to ink up the edges of the pages and give them that shabby chic look.  In the spine I put a grommet to thread through the chain and charms that I added.


For the cover of the book I used the inside of a file folder.  If you have worked in an office you might be familiar with them.  They are red press board file folders with brown cardboard dividers in the middle, typically two or three dividers and are bound with really strong fabric across the spine to endure much handling and many papers in the file.  We were tossing some at work because they were starting to look pretty shabby on the outside, but the inside was still in relatively good shape.  Besides, I was going to cover it all with patterned papers.  I chose to cut the edges of the cardboard insert about 1/4 to 1/2 inch larger than the edges of the paper bags.  This provided about a 1/2 inch or so wide spine to affix the paper bags to.  The pages of the book are paper lunch bags.  I had a number of embellishments, but needed to pick up some others to make the book in its final form. For the front here I used a beautiful yellow butterfly, a metal plate in the upper right corner that says Best Friends and a remember when sticker in the lower left corner.  On the four corners of the book I used some Tim Holtz metal picture corners.  They worked perfectly and will help preserve the corners of the book and keep it from wearing out too quickly.  On the front I added a pretty glass looking button and on the back a grommet through which I tied some thin matching ribbon and affixed a small brass key to the end.  I then wrapped it around the end of the book and looped it around the button to be used as the book closure.

If you visit  Following the Paper Trail you will get the exact directions for how Laura puts together the paper lunch sacks.  I found it to be a very easy tutorial to follow and I made quick work of taping down the bottoms of the bags and attaching them together.  Then I had to choose coordinating papers from the paper pack.  I tried to coordinate colors as it was mostly floral papers that I was using. 

Once I got that done I started pulling pictures.  They start with our high school graduation pictures and proceed through our weddings, baby's, class reunions, trips back and forth, Christmas family photos, and pics of us with our families.  On the inside of the cover is a small envelope with a sentiment on vellum paper.  Our class song...Friends by Elton John was printed on vellum also and mounted to the left of our senior pictures.  The next pages mirror each other with a few pics of our weddings. I tried to mirror the photos, so one of her and her attendants, one of me and my attendants...you get the idea.  You also see ribbons sticking out of the bag pockets.  I put additional pictures on card stock and then put a grommet in the end of each card and looped an organza ribbon through it.

I also found some Jolee's embellishments for graduations, weddings, babies, etc. and added those to the pages as well.  I found that the paper bag bottoms that proved to be the short pages in between the regular sized pages were great for the embellishments or sentiments.  It allowed me to use more photos on the larger pages too.  I also used lots of different stickers and sentiments as well as stamping up and inking other sayings about friends and time and fixing those on the pages.  Additionally I stuck in some bling and more butterflies, because what flower garden is complete without butterflies.  The final two pages and the last pocket were mostly pics of Becky and me through the years.  Talk about a walk down memory lane...and boy the hairstyle and clothing changes in 35 years!  Good for lots of laughs for sure.  Great memories as well!  I hope she enjoyed receiving it as much as I enjoyed putting it together.

Until next time...Imagine, Create, Enjoy!   


Wednesday, October 19, 2011

More Romance

I posted some romantic cards earlier and promised a view of some more of what I sent off.  For the background of this card I used a solid red glitter card stock I had picked up to go with the craft paper from this Recollections Love Letters pad.  It is another 6 x 9 card.  For the card mounted on the front I used the corner of one of the 12 x 12 sheets from the pad with a beautifully glitter embossed flower and some swirls overlaid on music stanzas.  To make the sentiment block on the front of the card I inked up my Cuttlebug frames die and cut the block. This was my first try at inking up the die/embossing folder and I really like how it turned out.  I used Tim Holtz' Fired Brick ink.  I added the sentiment on the front along with some matching red bling on the schwoopie's.  Some of the cards I left blank inside so the sender could write their own note inside.


The next 12 x 12 sheet had this beautifully embossed word Love in the lower corner.  I used that section of the card stock and cut another 6 x 9 card.  Since the card had the word taking up the majority of the front of it I felt like it didn't require much added embellishment.  I added one large crystal bling to the end of the L schwoop and then used my SU! butterfly embosslets die to add a couple of embossed butterflies.

For this card I used the rest of the red glitter card stock for the back and the other section of the music notes paper from above.  I wrapped a gold satin ribbon threaded with a bejeweled red heart around the top of the craft card and affixed it on the back side.  I used the thank you stamp and stamped it in the small block on the faux sewn line.  It fit perfectly in the space provided!  I love it when that happens.  I then mounted the craft card on the glitter card stock.

I am really enjoying this paper stack and thoroughly loved making these cards.  I hope the recipients enjoy receiving them as much as I've enjoyed making them. 

Once again, Imagine, Create, Enjoy.

Anniversary Cards

Needed some anniversary cards this month.  I had some papers from Valentine's Day so set about making a card for my BFF.  Becky and Ed celebrate their 35th anniversary this year.  I had picked up a Martha Stewart butterfly border punch and had not yet tried it out.  I started playing with it and decided that the border turned out so well that I wanted to use it on the anniversary card.  I used some pearly white card stock by Gemstones and cut it to a 6 x 9 size, scored at 4.5 inches and folded in half.  I cut the patterned paper from Little Yellow Bicycle called Love Story to fit on the 6 x 4.5 front of the card stock.  The paper had come out around Valentine's Day.  I punched the beautiful butterfly border using a pearly pink from the Gemstones paper.  I cut the tag from the Spellbinder's Nestabilities die and used my little stamp about true love stories...I added pink pearls at the top and bottom of the sentiment.  I mounted the sentiment using pop dots then cut more pop dots to mount on the butterfly border to make it stand up over the edge of the sentiment block.  To finish it off I stamped Happy Anniversary in the inside of the card and added a pretty matching pink bow with some satin edged organza ribbon from the dollar bin at Michael's.


Next up I worked on an anniversary card for my sweetie.  I used embossed craft paper from my Recollections Love Letters pad previously mentioned in my blog. I cut another 6 x 9 inch size card scored at 4.5 inches and folded in half.  I then cut one of the embossed papers from the collection to fit inside the 6 x 4.5 front of the card.  I used the Spellbinder's Nestabilities die mentioned above and stamped in horizontally with another one of my love stamps.  Since I was working with red embossing on the craft paper, I stamped the sentiment in red and then inked around the edges of the sentiment tag; at the top of the sentiment I added light grey pearls.  I used a pearly grey Gemstones paper and cut a butterfly border for the bottom of the sentiment.  I used pop dots to lift it over the bottom edge of the sentiment.  To finish it off, I added a sparkly red ribbon bow to the front and stamped Happy Anniversary inside the card.  Happy 30th Anniversary dear!


I think they both turned out very nicely.  Until next time, Imagine, Create, Enjoy.