Tuesday, April 12, 2011

Photo Book/Journal

My niece Teri crafts through sewing.  She inherited a fabric supply when my mom, her grandma passed away awhile ago and she has been busy with her own set of projects.  We are now in the process of bartering goods back and forth…her bags for my paper crafts.  Why do I mention this you ask?  She asked me to make a different kind of journal for her as part of my barter payment.  It is more of a photo/journal album than a straight journal.  Because she makes quilts, she wanted a book to put pictures into and then be able to journal on the pages to add details about the specific quilts.  I think it turned out quite beautifully.

These papers are by K&Company, Susan Winget’s beautiful Spring Blossom floral paper pad and embellishments. I also tried a new idea.  I wanted to create a clasp/closure on this one and found some beautiful buttons by Bazzill called Bazzill Buttons. I took the button and sewed it on the front of the book through the cover.  I then covered the inside with matching card stock.  On the back cover I cut a length of elastic and glue mounted it with a loop sticking out the end.  I then put additional reinforcing photo mount squares over the elastic, and matching card stock covered it on the inside back cover.  The word Quilts is chipboard cards that match also from Susan Winget collection as are the butterflies on the front cover.   


Until next time.  Imagine, create, enjoy!

Sunday, April 10, 2011

Journal/Planners


Black Friday Shopping
Gal Pals

So last fall, a friend of a friend and fellow blogger Cathy –Scrapping Cat! took the journal idea to a whole new level by making it into a holiday planner with beautiful Christmas papers.  Well I just had to give it a try as soon as I saw it!  They would be a gift for my Black Friday shopping gal pals!  These turned out great and very beautiful…the papers and embellishments out there today are wonderful. These particular papers are DCWV The Christmas Combo stack. 


Christmas Planner and Mini Book

I also found mini composition notebooks at the Dollar Tree store!  Love that place!  I used leftover scraps to doll up a small version as a little shopping list notebook, or place for notes, or whatever!  Just the right size for the pocket or pocket book!  

Everyday Planner

These have tabs at the top of the book with 4 different focus areas for the holidays: to create, to bake, to buy, to do, all subjects that Cathy had used in her original design.  Once I had done a few of these I was chatting with a co-worker on how they could be made for everyday use and what the tab subjects would be. We came up with the following subjects: Shopping, To Do, Appointments, Bills. I then made one that can be used for everyday use.  I used my Cricut to cut some hearts of the matching papers from My Mind's Eye "Home" paper stack, added some texture to the hearts with a dots embossing folder, cut a label for the front, and used my EKSuccess edge punch to give it some swirls and added a little bling in the corner.  This was a birthday gift for a sweet friend who is an expert list maker!

So this idea as Cathy mentioned in her blog lends itself to a variety of adaptations, daily planners specifically tailored to individual needs, travel planners, etc.  You get the idea.  Soon I’ll be posting another take on this traditional idea that my niece came up with.  First I need to send her the finished product!  Until next time… Imagine, create, enjoy!


Saturday, April 9, 2011

Paper Bag Photo Books


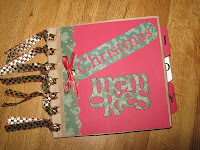
1st Attempt -- Christmas Album

A couple of years ago I saw at a local craft store a sample paper bag book for which they were offering classes.  Well with Christmas approaching I really couldn’t afford the class, but I did have a supply of scrapbook paper, embellishments, and some brown paper lunch bags I could use to try my own version of this idea.  Well, that was then, and a year and a half later I have thoroughly enjoyed crafting these great gift ideas.  I also have managed to sell a few to my friends who readily admit, crafting is not their thing!   I have used different papers, depending on the theme I wanted to highlight, i.e., Christmas, Valentine’s Day, Travel.  So for this first attempt I used paper I had in stock, a my tab punch, my handy Cricut machine and stickers and embellishments in my stash.  To secure the spine of the book I punched seven or eight holes with a standard hole punch. For this first one I cut individual lengths of ribbon and slip knotted them around the holes. That didn't work so well, the ribbon I chose was rough and they want to frequently work loose. On future books I changed my strategy at the suggestion of a co-worker and have now started weaving a matching ribbon approximately 36 inches long once down through the spine and then turned around and wove it right back up the spine.  At the top I then tied a bow.  You can also attach jewels, beads, trinkets, whatever you want to personalize it.  Here are a few samples of other themes.
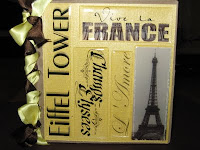
Travel Album

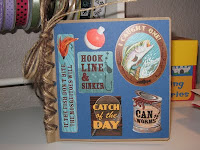
Fishing Album

I varied the themes and methods but the general idea comes through.  For the fishing book I used two or three different colors of twine I had laying around, doubled it up and wove it through the spine.  I also added a couple of small fish hooks.  This is my son Nathan and his fiance Laurencie's brag book for when they go fishing.
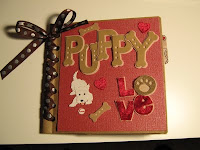
Puppy Love Album

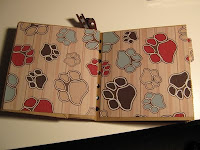
Inside Pages Puppy Love Album


 This book is for a dog lover friend and former co-worker.  The ribbon has little paw prints on it and I managed to find some paw print and dog bones papers for the insides.  She loved her little Dog Album. 


Recently there have been a number of friends, friends of friends, aquaintenances who have been diagnosed with cancer.  I wanted to do something that would allow them to record this part of the journey in their life.

Front of Album

I came across these embellishments at JoAnn’s, themed around cancer.  Surely that sounds a little weird, but it gave me an idea…here is a sample of what I gave my friend. 
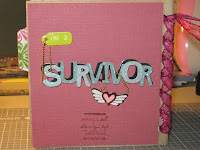
Back of Album


To these survivors I take off my hat. You are exceedingly strong and I admire you. 

If you are looking for a simple, imaginative, way to treat someone with a special gift that will help them store their memories, this is a perfect little project.  Until next time... Imagine, create, enjoy!  


Thursday, April 7, 2011

Artistic Block

Anyone who has every made anything, and I do mean anything, has probably suffered from artistic block.  It is the bane to everyone that designs or creates something.  That time in your creative endeavor, whatever it may be, when you can not, for the life of you, come up with the way you want to lay out your pictures on the scrapbook page, or the paper colors you want to use with those pictures, or the card you want to make, or the gift you want to create.  You see ideas and you think how cute is that, but when you sit down to work your own magic, you can’t get it right, you don’t have the right colors of this or that, you don’t have the right embellishments, you just don’t!  Those moments are some of my most frustrating…I know what I want in my mind, but can not, for some unknown reason, translate that to the project. 

So what have I done to get over the artistic block?  I wish it was something profound…I think it’s more basic than that.  I take a step back…I put the project out of my mind (at least the forefront of my mind).  I believe it is still there, simmering if you will, in the back of my brain.  Peripherally, I’m still rolling it around, it’s not taking up major space, but it’s there, in a file drawer waiting, waiting.  For me, it is sometimes the most simple things that open that drawer…watching nature, observing people, leafing through magazines, idea books, browsing in a store, and then it comes, an “ah ha” moment, when it clicks. You become so excited again at the potential of what your project can become!

Thanks for stopping by, until next time!  Imagine, create, enjoy!

Thursday, March 31, 2011

Birthday Cards - Part Two

Last time I was here I mentioned how far behind I was in sending out my birthday cards this year.  This doesn't count the fact that I have a lot of birthday's coming up in April.  Luckily, that little session of card making morphed into a super Cricut session since I found the lovely little border feature on my Doodlecharms cartridge.  I originally used the cupcake to recreate the card you saw last time, but wanted to use it in the border feature.  So I had scraps, lots of scraps which I had wanted to use and here is the result.

I have wondered since I started this session why it took so long for me to get going with my Cricut given the results I've had this week.  I think I was a little scared of the darn thing!  How silly is that!  I now know to check out my Cricut books more often to see what jewels I'm missing! 


So in addition to the cupcake border, I've now used the Doodlecharms border feature with packages, ice cream cones, and party hats.  Here is what I managed to come up with so far.  The borders were cut manually, not with the Design Studio software and I adjusted the size manually as well, they are 3 inches.


I used various papers that I had in my stash, some of which are a couple of years old! I also used the Cuttlebug Divine Swirls embossing folder on the party hat cards.


Imagine, Create, Enjoy!  Till next time.

Saturday, March 26, 2011

Birthday Cards

Last night I was web surfing and checking out other crafting blogs...so I went by my friend Tina's blog and saw the absolutely cutest birthday card idea.  Well I've been trying to do some family birthday cards for the last three months!  I've just been stumped on what to do for teenagers, and her post last night http://thecrazystamplady.blogspot.com/2011/03/cupcake-case-copy-and-share-everything.html was my answer.  Here is my version of her CASE (Copy and Share Everything) card.

It doesn't follow her card exactly, instead I used my Cricut to cut the cupcakes and for the background I used a patterned scrap I had left over from another project instead of embossing a background like Tina did. I chose oranges and yellows for my colors.  The patterned paper is also in orange and yellows which is a little hard to see.  I think it turned out pretty darn cute!  This is for a niece's birthday.


Well then, because I had the Cricut out and was on a roll I decide to work on some manly birthday cards.  It is difficult sometimes to make them good looking and not try to bling them up!  So I found this option for borders on the particular cartridge I was using and came up with this next card.  I think it is cute and very simple.  I worked it a little more and added a couple of things to change it up.  One is for a young man (teenager) so I made it sports oriented.  The second is for a older man's birthday.  They were such fun and since I had cut a number of the cuts from the same page (never waste paper), my girlfriend took home a couple to make her own cards.  I used off white crochet thread and sponged it red and blue and tied the little tags around the packages after using grommets to glide the thread through.  I popped up the presents under each package with pop dots.  I mounted them on colored cardstock embossed with the StampinUp! Sizzix textures embossing plate.  The one that looks a little like garage type metal.  Then added the popped up birthday wishes oval on the front and added a Happy Birthday sentiment on the inside.  I'm looking forward to using this border idea for some occasions other than just birthdays. 
Until next time! 


Friday, March 25, 2011

Grandchildren

I have so thoroughly enjoyed becoming a grandma!  My grandchildren delight me in so many ways and at the end of the day, I get to send them home to their parents!  However, I am thoroughly enthralled with my granddaughter.  I have raised and lived with men all of my married life.  My husband's daughter lived mostly with her mother, so needless to say...I'm used to being around men most of the time!  I love having a granddaughter...I get to buy her girly clothes, and jewelry boxes, and baby dolls.  Better yet, I get to make her a scrapbook with lots of girly things, flowers, and pink and purple papers, and flowers and cute little sayings about girls.  Madison Claire will be three here in another week and I have been working on her baby album for the last three years...or maybe I should say not working on it.  First I needed pictures from her mom and dad, then we moved...life!  I have done a few pages and below are a couple of pages that I love.  Madison or Maddy as we call her has a personality all her own and her mommy and daddy have done a wonderful job capturing those expressions, and I wanted to reflect that in a set of pages for her.  Here are The Many Faces of Madison Claire.


Well that's it for now...back to my crafting table!